Pages Menu
Categories Menu

Posted by on Jun 4, 2018 in Birds and Blooms, Hand written, Happy Birthday, Heat Embossing, Heat Embossing, June 2018, Layering Ovals, Petal Palette, Petals and More, Silver Embossing Powder, Stampin' Blends | 2 comments

Stampin’ Blends

I love craft supplies!  I really enjoy trying different coloring methods.  That being said I also have a little sickness called “full set syndrome”  So, when I discover a new coloring medium I dive straight in having to have them all. When Stampin’ Up! introduced their new alcohol markers back during the winter, I was all in!  I loved the alcohol markers I owned (Prismacolor). And now I could have a similar marker with Stampin’ Up! exclusive colors!!! Um, Yes! PLEASE!  When I got these markers in my hand I was even more head over heals!!! The Stampin’ Blends are beyond amazing!

The Creative Way – A Product Feature, Stampin’ Blends

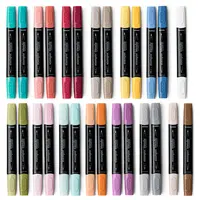
These amazing markers come in 13 amazing colors currently!  A light and dark of 11 Stampin’ Up! colors, ivory, and bronze. There is also a color lifer. The colors available now are, light and dark of each: Daffodil Delight, Old Olive, Cherry Cobbler, Night of Navy, Rich Razzleberry, Pumpkin Pie, Bermuda Bay, Crumb Cake, Smoky Slate, Pool Party, and Calypso Coral.   Very soon, there will be even more colors added! (Hopefully Mid June)

Stampin' Blends


Why do I love these markers so much? Because as the name suggests they have a amazing ability to blend together creating a smooth or compleat colored image with out harsh lines.  This is because of the alcohol in the markers.

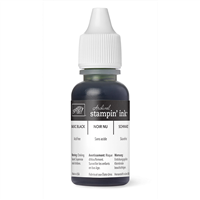
When working with Stampin’ Blends you want to use an ink that will not bless when the alcohol touches it!  Stampin’ Up!  has a great in that is perfect for the Stampin’ Blends. This ink is Memento Tuxedo Black. There are other choices on the market.  But, Memento Tuxedo Black is a wonderful ink that you will enjoy using.

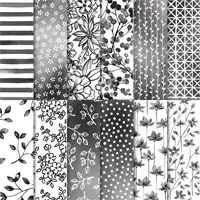
The paper you choose to work on will greatly determine the results of the project. Whisper White is a wonderful choice! The clay finish on the paper makes it wonderful to color on.  Shimmery White is also another choice.  The ink moves really well on Shimmery White Paper.  So, you have to be really careful when coloring close to the edges of images. Cause the color will bleed on this paper.  But, this is easy enough to fix with the color lifter. Another great choice is Glossy White. The blends become very bold on glossy white paper!  The blending effect is less and it is really easy to get dynamic colors.


Today I am show you two cards that have the same background. One is on shimmery white paper The second is one is on Glossy White. Hopefully you will be able to see the difference in the two papers. Both backgrounds were made by scribbling color in kinda rainbow order… The first color was the New Pineapple Punch (available Mid June), then Daffodil Delight light and dark, Calypso Coral light and dark, Cherry Cobbler light and dark, Lovely Lipstick (available Mid June), and Rich Razzleberry light and dark.  Each time a new color was added It was overlapped with the previous color. And if needed more of either overlapping color was added. This created the desired gradient look.  After the coloring was finished the background was spritzed with alcohol leaving water like spots. Also I Flicked ink from several of the markers over the background

Card

  • The background is shimmery white paper with a Stampin’ Blend gradient color pattern
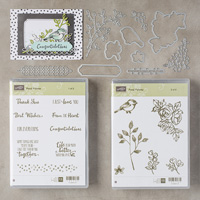
  • The second step was to add the text from the new Handwritten Background stamp with white embossing powder
  • The next step was to heat emboss the edges of the paper
  • Then I picked two contrasting colors (to the background), Bermuda Bay and Granny Apple Green. For the bird and leaves

The stamp set used is Petal Palette along with the Birds and Blooms Thinlit Dies and Petals & More Thinlets Dies

Happy Birthday Card

  • This background is Stampin’ Blends on Glossy White Paper
  • The Happy Birthday was die cut in both Bermuda Bay and Granny Apple Green then sniped so that the Granny Apple Green Birthday could be glued on top of the happy Bi in Bermuda Bay
  • The silver oval is two layers of silver embossing powder. This give the oval a metal look

Hers a look at the two cards side by side! In this picture you can see the difference in the two backgrounds.  Remember the only difference in the process of making the backgrounds was the paper

Gradient background with Stampin' Blends

I really enjoyed making these easy backgrounds! I hope you will give this fun technique a try!

Each of your comments makes me smile! Please, comment HERE.

you can see day one of June’s The Creative Way here


The All New Catalog is available and ready for you to shop from.  You can shop online here

We had a good weekend in Birmingham celebrating with my cousin Cody and his Bride Karley! We are so happy for them!! I’m leaving you with a picture from that day!

Have a great Monday! Go and live creatively my friends!

Peace-

Jennifer

Read More

Posted by on Jun 1, 2018 in Accented Blooms, June 2018, Stampin' Blends | 1 comment

New catalog day!!!

Today is the launch of the All New Stampin’ Up! Annual Catalog!!! I am so excited about the New products!! There are so many exciting new products and stamp sets! This catalog defiantly has something for everyone!!! I am even more excited to be sharing an all new stamp set with you today to celebrate!!

Accented Blooms

Accented Blooms Stamp Set by Stampin’ Up!

I adore this stamp set so very much!! It is so very classic.  Yet it definitely has a very modern feel to it! This is my favorite combination of styles for a stamp set!  So, I know I had to have it!

The Creative Way – A Product Feature

One of the products that I’m most excited about is that the Stampin’ Blends are back.  The colors have been on backorder for sometime now.  And very soon we will have all new colors available!!! Yeppie. Because I just love this product so very much, I decided that the Stampin’ Blends were going to be the feature product for The Creative Way in June!!

Always thinking of you

  • The bloom was stamped with memento ink on shimmery white paper
  • Then colored with the Stampin’ Blends
  • I learned that the blends move very well on this paper.  So you have to be very careful or it will bleed.  Also, have your colorless blender handy to fix mistakes
  •  The next step was to color the background. For this I used two prismacolor markers, pewter and light jade
  • The Sentiment was heat embossed with black embossing powder!  I am super excited that we have black embossing powder back

One of my favorite things to do with my Stampin’ Blends is to combine them with my prismacolor alcohol markers.  This allows me to have even more variety of colors and it is just fun to come up with different color combinations! As the Stampin’ Up! Blend family of colors grows, I am sure I will do less of this.  If you have copics or other alcohol markers then the Stampin’ Blends will be the perfect addition to your collection!  They will give you perfect coordinating with your Stampin’ Up! Colors!!! How exciting is that!

The new Soft Sea Foam is a beautiful green! I am so happy that Stampin’ Up!  added it to their new Color Collection!  You can find it in the wonderfully updated Subtles!! Today it was paired with Basic Black and Daffodil Delight

Each of your comments makes me smile! Please, comment HERE.

Thank you for stopping by!! I hope you enjoy shopping the New catalog today!!!  Go and have fun and live creatively!!!

Peace-

Jennifer

Read More

Posted by on Apr 20, 2018 in annual catalog stamp sets 2017-2018, Coloring Tools 2017, Dapper Denim, Graceful Garden, In Colors 2016, Stampin' Blends | 4 comments

My kind of garden…

The Graceful Garden Stamp Set is one of my favorites for spring. I have always wanted a beautiful rose garden .  Gardening is necessary my thing…I love planting plants in the spring .I even enjoy taking care of the plants .But, somewhere along the way I stop watering them or I forget to fertilize them. So for now that beautiful rose garden is in my head . All ready to be recreated with the Graceful Garden Stamp Set!

Graceful Garden

Graceful Garden

I love the lattice-work stamp. This stamp will connect together in several spots to make a repeated pattern . And the large rose reminds me of the most elegant rose-bush ever . The little rose makes me think of old county climbing roses .

Graceful Garden

  • The lattice is stamped twice with Dapper Denim
  • The rose was stamped with memento ink . Then colored with Stampin’ Blends adding the darkest shading near the bold black .
  • The sentiment was stamped in Basic Gray.
  • The final step was to pop up the rose and the layers of the card.

Each of your comments makes me smile! Please, comment HERE.

Decorating envelopes is one of my favorite things!  I just stamped the lattice background and the small rose.  With some very simple coloring!

Garden Rose


Lots of awesome products are retiring from the Occasions and Annual Catalogs .You defiantly don’t want to miss out on these fabulous items!!


The Clarence Rack was restocked this week!  Lots of fun products up to 60% off!!!


Thank you for stopping by Westside Paper Creations!  I always enjoy sharing with you guys!

Peace my friends-

Jennifer

Read More

Posted by on Apr 18, 2018 in Coloring Tools 2017, In Colors 2018-2020, InKing Royalty Blog Hop, Let the good times roll - April 2018, Lovely Lipstick, Pineapple Punch, Stampin' Blends, We must celebrate | 25 comments

We must celebrat the good times….

Welcome to InKing Royalty’s April Blog Hop! This year’s hops are themed around some of our favorite songs. Today’s hop is pulls inspiration from B.B. King’s song “Let the Good Times Roll.” How fun is that?! We’ve created projects that either feature images with wheels (cards, wagons, bikes) or celebrate good times. We are excited to share our projects with you. After you read my post, I hope you’ll hop over to the next person on the list at the base of this post.

We all have those friends that make us laugh, smile, and generally feel better when we are around them. The we must celebrate stamp set honors those friends . The ones you have the most fun with.  Those that are in your tribe every step of the way!!

We Must Celebrate Stamp Set

We Must Celebrate Stamp Set

These critters are the best of friends . And you can just tell the party is going to be awesome!!!   That memory are about to be made ?

We must celebrate

  • The critters are stamped in memento tuxedo black .This is a Stampin’ Blends friendly ink.
  • The confetti was stamped in smoky slate .I stamped it twice before re-inking
  • Then I used the Stampin’ Blends to color everything in
  • The shadows in the grass are dark old olive pounced into the very saturated light old olive grass .
  • The sky was quit a challenge . Just keep at it .Eventually, you will end up with something you like .Mine is still very streaky . But, by adding different colors it kinda looks like clouds in the sky.
  • The banners are two of the new In Colors – Lovely Lipstick and Pineapple Punch.

Each of your comments makes me smile! Please, comment HERE.


Thank you for hopping along with us. If you get stuck during the Blog Hop, please use this line-up as a guide:


  1. Brian King at Stamp with Brian
  2. Sue Jackson at Just Peachy Stamping
  3. Jennifer Spiller at Westside Paper Creations
  4. Rachael Shedeed at Bluebonnet Stampin’
  5. Lynn Kolcun at Avery’s Owlery
  6. Lisa Pretto at InkBig Academy Stamps
  7. Robin Myren at Songbird Designs by Robin
  8. Shawn de Oliveira at Shawn Stamps
  9. Nina King at InkPaperSequins
  10. Candy Ford at StampCandy
  11. Imogene Thomas at MomoMakes.com
  12. Robbye Hamilton at Miss Hammie’s Crafts
  13. Jackie Beers at Blue Line Stamping
  14. Julie DiMatteo at The Paper Pixie
  15. Denise Hoepfner at The Mountain Magpie
  16. Deb Cozzone at Grand Central Stamping
  17. Pam Morris at Tap Tap Stamp


Lots of awesome products are retiring from the Occasions and Annual Catalogs .You defiantly don’t want to miss out on these fabulous items!!


The Clarence Rack was restocked this week!  Lots of fun products up to 60% off!!!


Thank you for stopping by today.  I hope you’ll hopalong to the next stop on the blog hop, Rachael Shedeed at Bluebonnet Stampin’. There’s lots of inspiration to be found in this group – and you don’t want to miss it!

Peace

Jennifer

Read More

Posted by on Mar 27, 2018 in Color Me Happy Stamp Set, Copic style coloring, Envelope Love, Hello Cards, InColors 2017, Occasions Catalog 2018, Petal Palette, Petal Passion, powder Pink, Stampin' Blends, Tranquil Tide | 4 comments

It’s a colorful day

Some times  you just have to create your own color!  The days have been cool and gray here in Alabama.  So today, I decided it was time to create my own Spring!!  I love the colors of spring! Bright yellows, pinks, corals, and shades of green . It is just a happy time of year.  To recreate my Spring day, I chose the Petal Passion Designer Series Paper .  This paper is so fun to color!

Petal Passion

Petal Passion Designer Series Paper

I truly love this paper!  The patterns are modern and classy!! The most perfect combination for Designer Series Paper!!!   If you choose to color the paper it completely changes the look of the paper . My favorite way to color this paper is with Stampin’ Blends.  The Stampin’ Blends are Stampin’ Up! version of Alcohol Markers. They will be available soon! Due to popularity they are currently sold out!  But, they will be back soon! Stay tune for more!!

Petal Passion Card

  • The card base is Powder Pink cut at 4 1/4 inches and scored at 5 1/2 inches.  I call this the Brian way, cause he always makes his cards this way!  And Brian was the first person I noticed to do this years ago.
  • The layer is Tranquil Tide
  • After coloring the Petal Passion Designer Series Paper, I had a 6×4 piece,  it was cut down to fit the card.
  • The final step was to pop up the sentiment from  the Color Me Happy Stamp Set

You guys know I love to decorate my envelopes . I did something a little different for this envelope!

Petal Palette Stamp Set

  • I made a square using a t-ruler and a pencil .
  • The second step was to add the stamped images from Petal Palette stamp set
  • Then, I added the square with a fine line pen.  After adding the ink lines, I erased the pencil lines
  • You can see some pencil lines within the square . That is for the address.  They will help me right straight . After I address the envelope, I will erase the pencil lines

Petal Passion Card

Each of your comments makes me smile! Please, comment HERE.


Below is the list of products used .If you have any questions, feel free to email me!

Thank you for stopping by today!  I hope each of you have a little time today to be creative!

Peace-


Jennifer

Read More