Pages Menu
Categories Menu

Posted by on Dec 2, 2021 in Christmas 2021, Concord and 9th, Cranberry Ink, Iuile watercolor, Mica Watercolor, Simon Says Stamp, watercolor, Winter Floral Mix | 4 comments

Mica Watercolor

I have a new obsession, Mica watercolor! I was watching one of Kristina Warner‘s youtube lives and she was using the most beautiful handmade mica watercolors. So of course I went right over to Etsy and purchased a set, Iuile Watercolor by Jeanie. Now, you should know, I have been pondering the Mica watercolors for several years now. Always at Christmas time. In years past I have been able to talk myself out of them. But, this year I just couldn’t resist anymore!

These watercolors are definitely an investment. Just like any quality watercolor. But, let me tell you they are well worth it!! First of all, the mica colors are just fun to use. Secondly, the colors are rich and vibrant. And, finally who doesn’t love shimmer and shine!!!

As you can see. The pigments show up well on creamy watercolor paper or black watercolor paper. I was looking for bold color. So, I went with black watercolor paper. The paper I used is Van Gogh Black Watercolor Paper.

After deciding which paper to use. The Next step was to pick an image and heat emboss it onto the watercolor paper. I decided on the winter floral mix background stamp by Simon Says Stamp. The embossing powder I used is my favorite! Hero Arts brass embossing powder. I use this embossing powder all the time!!!

Now it was time to watercolor my background! Iuile Watercolor was just super fun to use and surprisingly easy to work with. One key thing to know is you really have to give the water and pigment time to mix before you start painting. Encouraging the two with your brush helps.

When I was done watercoloring. I made two different cards!!! I really don’t want to waste one bit of the watercolor background!

  • This card was heavily inspired by a card design from Online Card Classes, Day 2 of the Holiday Card Workshop 2021.
  • The background is stamped with a poinsettia from Unity Stamps in Cranberry ink (Concord and 9th) on School House Red (Simon Says Stamp).
  • The pearls are Exotic Onyx (Studio Katia) and Matte Gold (Pinkfresh Studio).
  • The sentiment is one I have had a while, Birch Press Sugar Script. It is die-cut from leftover black watercolor paper and I added Star mica watercolor on top.

Here’s a up-close of the shimmer and the background stamping.  I love how the settle stamping adds elegance to the card! 

The second card just might be my favorite card I’ve made in a very long time!  

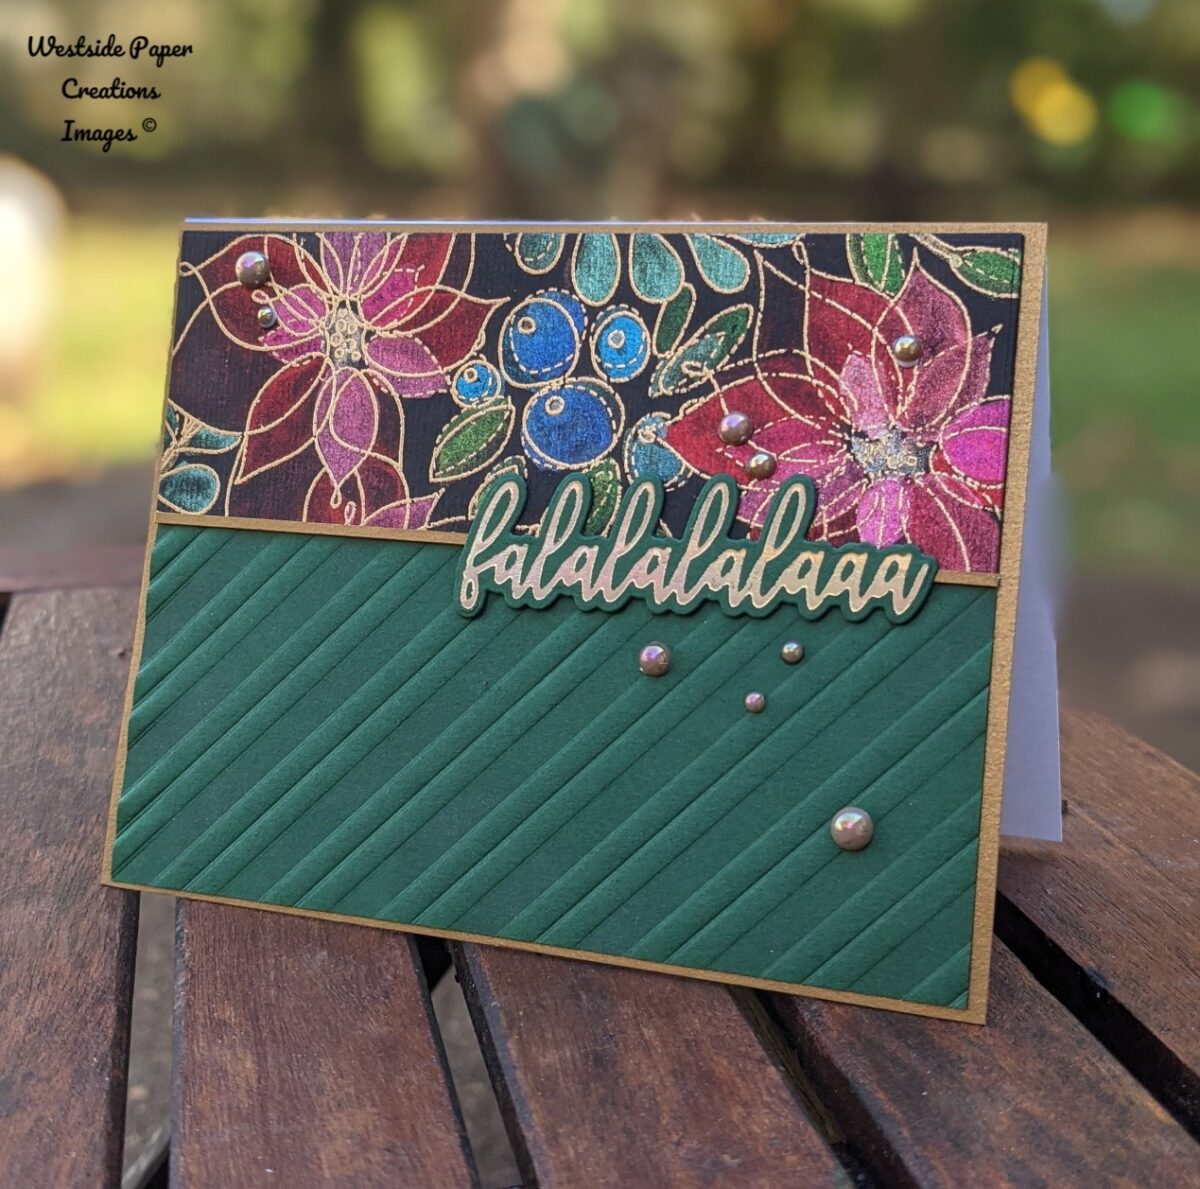
  • This card uses a classic design that I go back to over and over.
  • The Spruce Paper is embossed using a Diagonal Stripes hot foil plate (Pinkfresh Studio)
  • The Gold and Spruce Paper is from The Paper Source.
  • And that adorable foil sentiment is from Picket Fence Studio, unfortunately, it is long retired.

Below is a list of products used. Affiliate links are used when applicable. 


Thank you for stopping by today!  I hope you have a few minutes to feed your creative soul!


Jennifer

Read More

Posted by on Aug 19, 2020 in Embossing, Faux Batik, Heat Embossing | 41 comments

Autumn Weather with the Inking Royalty

Welcome to the Inking Royalty’s August Blog Hop! During this year’s blog hops, we are enjoying a year of celebrations. This month’s projects celebrate Autumn Weather, so prepare yourself for projects that are filled with warm tones and beautiful nods to the upcoming change in weather. We are excited to share our creations with you today! After you read my post, I hope you’ll hop over to the next person on the list at the base of this post.

You guys know me well enough by now that you know I kinda take a different approach to the blog hop themes. This month is all about Autumn weather.   Fall is a beautiful time of year. We have football, pumpkins, apples, and leaves changing.  I’m sharing with you one of my favorite techniques that reminds me of leaf rubbings.  It doesn’t really look like leaf rubbings but, the technique is beautiful with leaf imagines. Something about the process completely reminded me of leaf rubbings.  I have not done Faux batik in a long time! So, it was definitely time to pull it out of the vault and play.

In thinking about which stamp set to use I landed upon the newish, Forever Fern stamp set. A few reasons why I chose this stamp set.  1. I have had the most success with the Faux Batik technique when using solid images.   2. This stamp set is beautiful!

Forever Fern

Forever Fern stamp set

This red rubber Distinktive style of stamp is so much fun to use!  I really love red rubber stamps and it really makes me happy that Stampin’ Up! has this awesome line of stamps

There are several steps to the Faux Batik technique.  Basically, you stamp the image on tissue paper with versa mark ink. Then heat emboss the image.  I often use metallic embossing powder. But, that is not necessary.  The next step is to use a baby wipe to add ink to the image as it is layered over shimmery white paper.  To see specific instructions please check out this post!

The card base is stamped using the Very Versital stamp set! I truly adore this stamp set! I always tend to overdo the grunge/ vintage look. As you can see above.  But, seriously, overdone it is still pretty

Very versatile

Very versatile stamp set

If you don’t have this beautiful stamp set you need it!  I used early espresso, mint macaron, and silver ink to create the background.  I also did a little sponging with Mango Melody   The thinking of you stamp was in my Very Versital stamp case. So, I really have no idea where it belongs. At the time I thought it was in the right place.

Each of your comments makes me smile! Please, comment HERE.

Thank you for stopping by today.  I hope you’ll hop along to the next stop on the blog hop, Jackie Beers at Blue Line Stamping There’s lots of inspiration to be found in this group – and you don’t want to miss it! If you get stuck during the Blog Hop, please use this line-up as a guide:

  1. Brian King at Stamp with Brian
  2. Sheryl Sharp at Sharp Notes by Sheryl
  3. Sue Jackson at Just Peachy Stamping
  4. Jennifer Spiller at Westside Paper Creations
  5. Jackie Beers at Blue Line Stamping
  6. Shawn de Oliveira at Shawn Stamps
  7. Rachel Brumley at Artistic Designs by Rachel
  8. Robbye Hamilton at Miss Hammie’s Crafts
  9. Candy Ford at Stamp Candy
  10. Lynn Kolcun at Avery’s Owlery
  11. Joanne Brown at Stamping with JoJo
  12. Sheryl Abernathy at Elegant Sentiments
  13. Robin Myren at Songbird Designs by Robin
  14. Linda Krueger at The Stamp Coach
  15. Pam Morris at Tap Tap Stamp
  16. Julie DiMatteo at The Paper Pixie
  17. Ann Murray at Murray Stamps Ink

I’m so glad you have taken the time to hop along with us today!  Please take the time to continue to hop along! I know everyone will have many beautiful autumn inspiration for you!  Remember to always find a moment in your day to be creative!

Peace my loves-

Jennifer

Read More

Posted by on Jul 24, 2019 in Blueberry Burst, ink blending, Pineapple Punch, Seaside Spray, sunshine july 2019, We'll Walrus Be Friends | 9 comments

One word blog hop “Sunshine”

Sunshine

Welcome to InKing Royalty’s July Blog Hop! This year’s Blog Hop themes are inspired by a single word – and this month our projects are centered around SUNSHINE. The Sun is the single most important source of energy for life on Earth – it guides our clocks, calendars and planting schedules. We may be enduring a heatwave this week, but we still associate the Sun with positivity, joy, and renewal. We are excited to share our creations with you today! After you read my post, I hope you’ll hop over to the next person on the list at the base of this post.

I had this vision in my head of a sunny background with the grass and flower silhouette (Friendly Silhouette Dies/149546)  The first step was to make a few Sun backgrounds.  I really wanted to capture that moment that the sun just starts to rise. The bright yellows against the darker blue almost night sky. To do this, I used sponge dabbers and ink!

Sun

  • I masked off an area for the ground.
  • Then ink blended the yellow.
  • After ink blending the yellow I added a circle mask to the mix.
  • Then more yellow ink and some blue.
  • The final step was to cut some masks to make sun rays.  And more ink blending.

The next step was to add the silhouette dies…..

Yea well, let’s just say…the card had other ideas of what it wanted to be. Seriously, this walrus (We’ll  Walrus Be Friends/149367) is just too cute not to be floating in the Sunshine!!!

  • The background is pineapple punch, daffodil delight, and mango melody for the sky.  The water is Seaside Spray and Pacific Point.
  • The sun rays were made with the side of the sponge dabber making a line from the sun to the sky.  The sun was masked at this point.  This created a softer sunray effect
  • After making the background, I added a horizon line using the Pacific Point Stampin’ Wright Marker
  • Then the walrus and fish were colored with Stampin’ Blends

Each of your comments makes me smile! Please, comment HERE.

Thank you for stopping by today. I hope you’ll hop along to the next stop on the blog hop, [insert name and blog name with imbedded links]. There’s lots of inspiration to be found in this group – and you don’t want to miss it!

Thank you for hopping along with us. If you get stuck during the Blog Hop, please use this line-up as a guide:

  1. Brian King at Stamp with Brian
  2. Sue Jackson at Just Peachy Stamping
  3. Lynn Kolcun at Avery’s Owlery
  4. Julie DiMatteo at The Paper Pixie
  5. Shawn de Oliveira at Shawn Stamps
  6. Jennifer Spiller at Westside Paper Creations
  7. Jackie Beers at Blue Line Stamping
  8. Jan Dufour at Stamp Me Silly
  9. Katie Ferguson at Cottage Paper
  10. Pam Morris at Tap Tap Stamp
  11. Sheryl Sharp at Sharp Notes by Sheryl
  12. Robbye Hamilton at Miss Hammie’s Crafts
  13. Candy Ford at Stamp Candy
  14. Linda Krueger at The Stamp Coach

I don’t often talk about how much I love being apart of the Inking Royalty! Brian is the best leader ever! He is full of support, advice, and acceptance!   Everyone in the Royals is so supportive of each other.  Many of us are there merely for the discount that goes along with Bing a Stampin’ Up! demonstrator!!!!  Many are building their business, in the Inking Royalty, all are loved and encouraged!!  If you have ever considered being a Stampin’ Up! Demonstrator the Inking Royalty is the group to be apart of! I can’t express how much these people have made my life better and brighter!

Peace my creative friends-

Jennifer

Read More

Posted by on Jul 5, 2019 in Blogging Friends Blog Hop, Friend Like You Bundle, July 2019, Pigment Sprinkles | 6 comments

Summer Lovin’

Today is the Blogging Friends hop! We are celebrating Summer!  The theme is Summer Lovin’…you got it right out of my favorite childhood movie Grease.  So, of course, I had to make a beach card for today hop!

Summer Lovin'

I had a bunch of ideas floating around in my head. One was to recreate the mood of the first scene in Grease. You know Danny and Sandy on the beach…

To create my scene I decided to do some watercolor.  For the watercolor, I just had to use the new Pigment Sprinkles.  Along with the new sprinkles, I used a few of the ink refills as watercolor. I just have to say, the new Pigment Sprinkles are so very vibrant!!!!

After picking what medium I was going to use for the background, I had to decide what stamps and dies to use!  My first choice was the Friend Like You bundle!  I knew that the palm tree die was a must.

Friend Like You Bundle

Friend Like You Bundle 10% savings

This bundle makes my heart so happy!!!  There are so many things to love!  The palm trees for one! The cattails (I have always loved cattails) Then you have awesome dies that can create really cool outdoor silhouettes.

Friend Like You

  • The first thing I did was to sprinkle out some pigment powders into a pallet. Then I added some water to make the fluid.
  • I watercolors the water using Blueberry Bushel ink refill and the Bermuda Bay pigment sprinkle.
  • As the water dried.  I started working on the sky, using Daffodil Delight and Mango Melody pigment sprinkles and the Calypso Coral ink refill.
  • There is this little strip of blue sky.  That was created with Smoky Slate and really watered down Bermuda Bay.
  • The specs of yellow on the water were a happy accident.  At one point I tried sprinkling some Daffodil Delight pigment.   And now we have a reflection of light…
  • The palm trees are pieced together from several leftover pigment powder test.

I completely hope you will give the Pigment powders a try!  They really make beautiful backgrounds and can be used for so many different ideas.

Each of your comments makes me smile! Please, comment HERE.


Thank you for stopping by!  I sure hope you hop along to see what everyone is creating today to celebrate Summer Lovin’  And just in case your not already singing Summer Nights in your head…

Peace my creative friends-

Jennifer

Read More

Posted by on Jul 10, 2018 in Copic style coloring, Mediterranean Moments, Stampin' Blends | 2 comments

Quite Moments

Every once in a while I just want to take a little time to really color something in great detail.  Normally, it is a Saturday morning having coffee and trying to recouping from the week. Taking a few quite moments to just be.  Coloring is a great way to escape and is a great way to learn meditation.  coloring is the closest we can get to meditation without actually really working hard to.  It is an activity that you can completely get lost in.  It can give you a sense of being centered and focused.  It really is a wonderful therapeutic activity.

∼ ∼ ∼

Recently, I shared a card using the Mediterranean Moments stamp set. It was a very simple card on Smoky Slate.  I loved the elegance of the gray-scale look of the card! You can see it here. Today, I have a version of the same card colored with Stampin’Up Blends.  The fun thing about using Stampin’ Blends on Smoky Slate is that the marker gives a very watercolor look.

Mediterranean Moments Stamp Set

Mediterranean Moments Stamp Set

I really love this stamp set!!!

We just got 11 new colors of Stampin’ Blends!  These markers are just fabulous!!! They are my favorite coloring tool at the moment…

Stampin' Blends

I love these markers so much they were the product featured in The Creative Way.  I really enjoyed taking a month and really exploring what all you can do with these markers.  The Creative Way is just a jumping off place for many ideas when it comes to such a awesome product!!!

Mediterranean Moments

  • One of the things I did was the bridges are colored with the dark versions of each color in the front. The ones in the back are using the light version of the colors. This is an easy way to add lots of depth to the picture.  The same was done with the bushes and the wall below the bridge
  • Don’t be afraid to try something different. The Stampin’ Blends are very unique looking on the Smoky Slate paper. The ink moves quite a bit more and gives a watercolor look
  • After the image was colored, I used the colorless blender to soften the edges.

Don’t be afraid to step out of your comfort zone.  Coloring can be very intimidating.  Just remember that creating is an exploration in the unknown, so really none of us have a clue what we are doing… Lydia at Understand Blue always says “create for the trash can”  I love this idea.  It gives you the freedom to let go and just create.

Each of your comments makes me smile! Please, comment HERE.


There are a few Stampin’ Up! specials this month. One is a Designer Series Paper Sale that is quite special!! Buy 3 get one FREE!!

Sale

The second is for those who Join Stampin’ Up!!  Everyone who Joins Stampin’ Up! to save on their favorite stamps, inks, and papers will receive a FREE family of inks!!! That’s 10 ink pads for FREE! How awesome is that???

Special


The Creative Way – A Product Feature

I adore sharing with you guys all about one product each month! This months feature product is the color Granny Apple Green!! I love the modern fresh feel of this awesome color!!! To see more about Granny Apple Green check out this month’s first post in the Series!


I always enjoy sharing with you guys!  I will be back very soon with a new instalment of The Creative Way! Till then go and live creatively.  I hope you find a few quite moments to try something new or revisit a favorite coloring tool!!

Peace-

Jennifer

Read More