Pages Menu
Categories Menu

Posted by on Jun 4, 2018 in Birds and Blooms, Hand written, Happy Birthday, Heat Embossing, Heat Embossing, June 2018, Layering Ovals, Petal Palette, Petals and More, Silver Embossing Powder, Stampin' Blends | 2 comments

Stampin’ Blends

I love craft supplies!  I really enjoy trying different coloring methods.  That being said I also have a little sickness called “full set syndrome”  So, when I discover a new coloring medium I dive straight in having to have them all. When Stampin’ Up! introduced their new alcohol markers back during the winter, I was all in!  I loved the alcohol markers I owned (Prismacolor). And now I could have a similar marker with Stampin’ Up! exclusive colors!!! Um, Yes! PLEASE!  When I got these markers in my hand I was even more head over heals!!! The Stampin’ Blends are beyond amazing!

The Creative Way – A Product Feature, Stampin’ Blends

These amazing markers come in 13 amazing colors currently!  A light and dark of 11 Stampin’ Up! colors, ivory, and bronze. There is also a color lifer. The colors available now are, light and dark of each: Daffodil Delight, Old Olive, Cherry Cobbler, Night of Navy, Rich Razzleberry, Pumpkin Pie, Bermuda Bay, Crumb Cake, Smoky Slate, Pool Party, and Calypso Coral.   Very soon, there will be even more colors added! (Hopefully Mid June)

Stampin' Blends


Why do I love these markers so much? Because as the name suggests they have a amazing ability to blend together creating a smooth or compleat colored image with out harsh lines.  This is because of the alcohol in the markers.

When working with Stampin’ Blends you want to use an ink that will not bless when the alcohol touches it!  Stampin’ Up!  has a great in that is perfect for the Stampin’ Blends. This ink is Memento Tuxedo Black. There are other choices on the market.  But, Memento Tuxedo Black is a wonderful ink that you will enjoy using.

The paper you choose to work on will greatly determine the results of the project. Whisper White is a wonderful choice! The clay finish on the paper makes it wonderful to color on.  Shimmery White is also another choice.  The ink moves really well on Shimmery White Paper.  So, you have to be really careful when coloring close to the edges of images. Cause the color will bleed on this paper.  But, this is easy enough to fix with the color lifter. Another great choice is Glossy White. The blends become very bold on glossy white paper!  The blending effect is less and it is really easy to get dynamic colors.


Today I am show you two cards that have the same background. One is on shimmery white paper The second is one is on Glossy White. Hopefully you will be able to see the difference in the two papers. Both backgrounds were made by scribbling color in kinda rainbow order… The first color was the New Pineapple Punch (available Mid June), then Daffodil Delight light and dark, Calypso Coral light and dark, Cherry Cobbler light and dark, Lovely Lipstick (available Mid June), and Rich Razzleberry light and dark.  Each time a new color was added It was overlapped with the previous color. And if needed more of either overlapping color was added. This created the desired gradient look.  After the coloring was finished the background was spritzed with alcohol leaving water like spots. Also I Flicked ink from several of the markers over the background

Card

  • The background is shimmery white paper with a Stampin’ Blend gradient color pattern
  • The second step was to add the text from the new Handwritten Background stamp with white embossing powder
  • The next step was to heat emboss the edges of the paper
  • Then I picked two contrasting colors (to the background), Bermuda Bay and Granny Apple Green. For the bird and leaves

The stamp set used is Petal Palette along with the Birds and Blooms Thinlit Dies and Petals & More Thinlets Dies

Happy Birthday Card

  • This background is Stampin’ Blends on Glossy White Paper
  • The Happy Birthday was die cut in both Bermuda Bay and Granny Apple Green then sniped so that the Granny Apple Green Birthday could be glued on top of the happy Bi in Bermuda Bay
  • The silver oval is two layers of silver embossing powder. This give the oval a metal look

Hers a look at the two cards side by side! In this picture you can see the difference in the two backgrounds.  Remember the only difference in the process of making the backgrounds was the paper

Gradient background with Stampin' Blends

I really enjoyed making these easy backgrounds! I hope you will give this fun technique a try!

Each of your comments makes me smile! Please, comment HERE.

you can see day one of June’s The Creative Way here


The All New Catalog is available and ready for you to shop from.  You can shop online here

We had a good weekend in Birmingham celebrating with my cousin Cody and his Bride Karley! We are so happy for them!! I’m leaving you with a picture from that day!

Have a great Monday! Go and live creatively my friends!

Peace-

Jennifer

Read More

Posted by on Jun 1, 2018 in Accented Blooms, June 2018, Stampin' Blends | 1 comment

New catalog day!!!

Today is the launch of the All New Stampin’ Up! Annual Catalog!!! I am so excited about the New products!! There are so many exciting new products and stamp sets! This catalog defiantly has something for everyone!!! I am even more excited to be sharing an all new stamp set with you today to celebrate!!

Accented Blooms

Accented Blooms Stamp Set by Stampin’ Up!

I adore this stamp set so very much!! It is so very classic.  Yet it definitely has a very modern feel to it! This is my favorite combination of styles for a stamp set!  So, I know I had to have it!

The Creative Way – A Product Feature

One of the products that I’m most excited about is that the Stampin’ Blends are back.  The colors have been on backorder for sometime now.  And very soon we will have all new colors available!!! Yeppie. Because I just love this product so very much, I decided that the Stampin’ Blends were going to be the feature product for The Creative Way in June!!

Always thinking of you

  • The bloom was stamped with memento ink on shimmery white paper
  • Then colored with the Stampin’ Blends
  • I learned that the blends move very well on this paper.  So you have to be very careful or it will bleed.  Also, have your colorless blender handy to fix mistakes
  •  The next step was to color the background. For this I used two prismacolor markers, pewter and light jade
  • The Sentiment was heat embossed with black embossing powder!  I am super excited that we have black embossing powder back

One of my favorite things to do with my Stampin’ Blends is to combine them with my prismacolor alcohol markers.  This allows me to have even more variety of colors and it is just fun to come up with different color combinations! As the Stampin’ Up! Blend family of colors grows, I am sure I will do less of this.  If you have copics or other alcohol markers then the Stampin’ Blends will be the perfect addition to your collection!  They will give you perfect coordinating with your Stampin’ Up! Colors!!! How exciting is that!

The new Soft Sea Foam is a beautiful green! I am so happy that Stampin’ Up!  added it to their new Color Collection!  You can find it in the wonderfully updated Subtles!! Today it was paired with Basic Black and Daffodil Delight

Each of your comments makes me smile! Please, comment HERE.

Thank you for stopping by!! I hope you enjoy shopping the New catalog today!!!  Go and have fun and live creatively!!!

Peace-

Jennifer

Read More

Posted by on May 29, 2018 in Lilypad Lake, Oil Pastils | 6 comments

Chilling at the unwind retreat in my mind….

One of my favorite Saturday morning activities is catching up on my favorite blogs.  Having coffee and chilling for a bit. This Saturday I was pleasantly surprised when one of my favorite bloggers, Lydia at Understand Blue, was sharing a technique she was teaching at her retreat!  Of course, I had to give it a try!

This super fun technique just takes masking paper, oil pastels, and paper!  Oh and your finger!!  Wow! I thought, I have all those things….lets give this a try!!!

I was not sure what I was going to do with this technique but, it just looked way to fun!   What you need to know, Lydia is my favorite artsy stamper! And she has this awesome Retreat that one day I’m going to actually attend!  They do all sorts of cool artsy stuff and post pictures on Facebook and Instagram that will just make you crafty soul envious of all the fun!  So,  I had my own little unwind retreat (in my head) day dreaming that Lydia was actually their teaching me.  She would have laughed at how old my oil pastels were(and dried up).  The oil pastels are actually a set I swiped from my Mom as a pre-teen when I took art.  And how hard I was ribbing with my figure.  I’m sure your not suppose to rub off your figure print while crafting. ? In the end the results were beautiful.

Lilypad stamp set combined with finger paint technique

  • For the background mask a line. Then use the line to apply the oil pastels. Use your finger to transfer your color from the masked area to the paper
  • I used shimmery white paper. But really any paper will work
  • The bird is stamped in Tranquil Tide as is the be calm
  • The “be calm” is part of a larger sentiment in the Lakefront set .I just sniped out the part of the sentiment I needed

Lilypad Lake is a wonderful stamp set!  It is one of the New Bundles available June 1!  Are you excited as I am about the upcoming catalog! There are some amazing stamps in there!  Lilypad Lake is one of the best! The bundle which includes one very unique die!  You will really enjoy have this set in your crafty stash

Lillypad Lake Bundle

Lillypad Lake Bundle

I have not had much of an opportunity to play with this bundle! But, I can tell you I am defiantly looking forward to it!!!  I just think it is wonderful!!!

 Here’s one last look at today’s card!

Lit pad lake stamp set and oil pastel technique

I hope you will consider giving this fun technique of finger painting with oil pastels a try!!!

The card layers are Tranquil Tide and Dapper Denim (retiring). Dapper Denim is retiring the end of May! I love this particular blue so very much!  It is just a great color!!

Each of your comments makes me smile! Please, comment HERE.


The Share What You Love bundle is jammed packed of stamping wonderfulness for every card maker or paper craftier out there!!! This bundle is only available for a limited time

Share What You Love Bundle

  • Bundles are exclusive to the suite early release and will no longer be available after May 31, 2018. Individual items from the Share What You Love suite will be available when the 2018–2019 annual catalog is released on June 1, 2018.

If you would like to see Cards with this bundle click here and here


Lots of awesome products are retiring from the Occasions and Annual Catalogs .You defiantly don’t want to miss out on these fabulous items!!

Retiring Stampin' Up! Products


Have a great Tuesday! I’m back in the land of reality and off to work today!  Go and live creatively my friends

Peace-

Jennifer

Read More

Posted by on May 15, 2018 in Big Shot, Black embossing powder, Heat Embossing, ink as watercolor, Lemon Lime Twist, Rooted In Nature, The Creative Way, The Creative Way -May 2018 | 5 comments

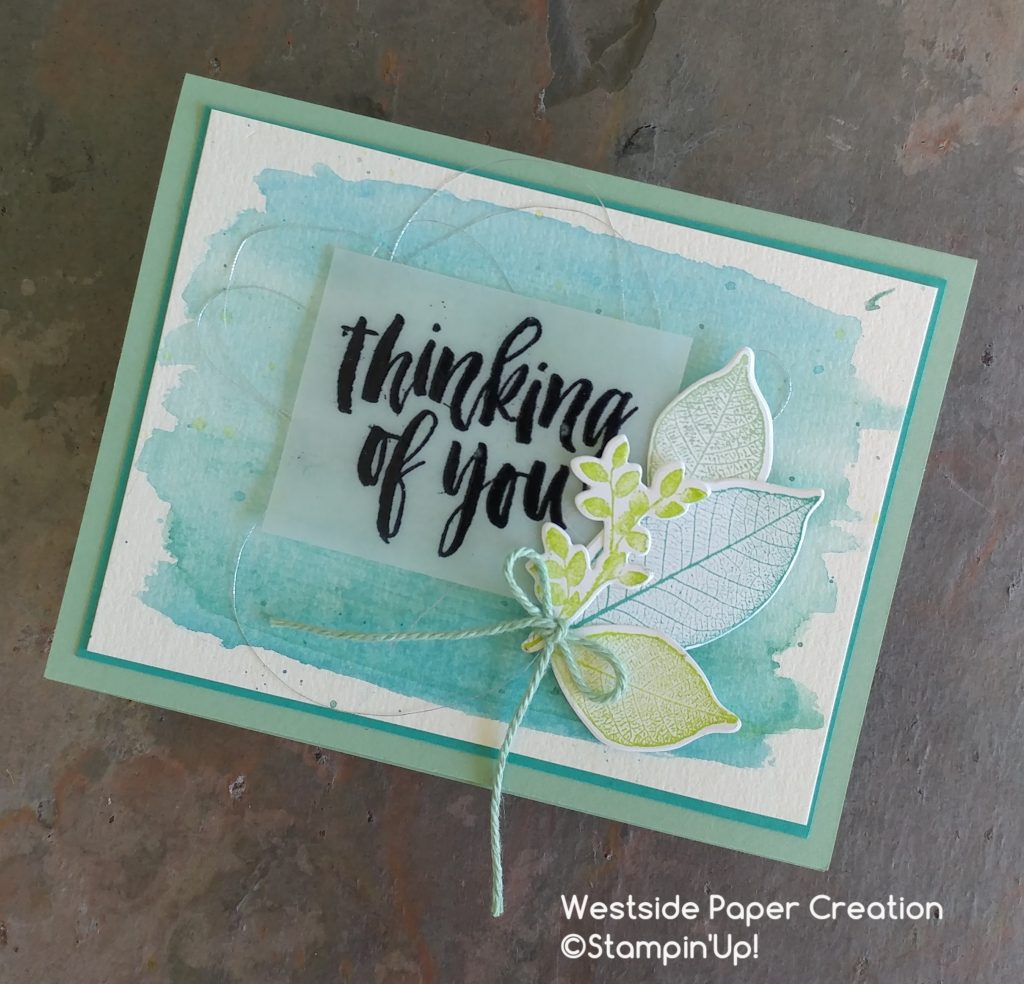
Rooted in Nature Thinking of You Card

Yesterday, I shared my version of a masculine card using the Rooted In Nature stamp set and Faux Batik technique. Today’s card is a softer more feminine card using a simple watercolor background and the same set! Thinking of you cards can be the hardest to make.  A soft watercolor wash seems to give a soothing fell along with a soothing color palette.

The Creative Way – A Product Feature – Rooted In Nature

This month for The Creative Way I am sharing projects made with the Rooted In Nature Stamp set!  This set will be available in June 2. I have so enjoyed working with the awesome stamp set.  Rooted In Nature is available as a Bundle which saves you 10%  The bundle includes coordinating dies!! How cool is that!!! You can join me Every Monday & Friday for The Creative Way – A Product Feature. Any yes, I know today is Tuesday!  It is a bonus day!  Yeppie!!!!

Nature

Rooted In Nature Bundle

I love watercolor backgrounds.  They are a quick way to add so much interest to a card!  Plus there’s like a million ways (techniques) that you can use to create fun watercolor backgrounds.  When I pull out watercolor supplies I normally end up making a bunch of backgrounds.  Mainly because I love the process of just sitting and trying different things till I’m content.  Also, it gives me a starting point for so many projects if I have a few watercolored papers hanging around. The other thing is watercolor always, always, always looks it’s worse right before it looks nice or pretty.  And wet always looks way worse than dry.  I can’t tell you how many prices of watercolor I have pulled out of the trash because I threw them away wet.  And once they were dry, I decided that’s not so horrible.  One of my favorite colors to use for watercolor is Tempting Turquoise (Retiring).  I just adore this color when it is combined with water! So, I wanted to make sure I used it on a card before it was gone!

Thinking of you card using Rooted In Nature

  • The watercolor was very simply done with ink refills and a aqua painter using Bermuda Bay and Tempting Turquoise
  • I worked Tempting Turquoise from one end to the middle. And Bermuda Bay from the other to the middle . Letting the two cross and blend.  This makes a very easy gradient wash.
  • After the initial color dried, I splattered Lemon Lime Twist on the background
  • The Leaves from Rooted In Nature were stamped in Lemon Lime Twist, Mint Macaroon, and Bermuda Bay. The die cut with the coordinating dies.
  • The Sentiment heat embossed with black embossing powder on vellum
  • The final step was to add some texture with the Sliver Thread and Nature’s Poem Twine (Mint Macaroon)

I love envelopes decorating! So I decided to add the leaves to the envelope!!!

Envelope decorated with Rooted In Nature Stamp Set

  • Using the same colors as the card, Bermuda Bay, Mint Macaroon, and Lemon Lime Twist the leaves were randomly stamped on the envelope flap
  • To protect the envelope front while stamping the flap, I used A piece of masking paper (Avery removable labels 6465)
  • The finishing touch was to add a few leaves to the front of the envelope

Thinking of you

Each of your comments makes me smile! Please, comment HERE.

  I hope you have enjoyed seeing this bonus card for The Creative Way!!  I have so enjoyed sharing Rooted In Nature with you! Also seriously, the Tempting Turquoise ink is amazing for watercolor!! If you like this look I highly suggest you purchase it now!!

The first post in The Creative Way  series shares a lot of my thoughts about the Rooted In Nature Stamp Set and the Nature’s Poem Suite that Rooted In Nature  is apart of! You can find that post here

For day 2! 

For Day 3!

For Day 4


The Share What You Love bundle is jammed packed of stamping wonderfulness for every card maker or paper craftier out there!!! This bundle is only available for a limited time

Share What You Love Bundle

  • Bundles are exclusive to the suite early release and will no longer be available after May 31, 2018. Individual items from the Share What You Love suite will be available when the 2018–2019 annual catalog is released on June 1, 2018.

If you would like to see Cards with this bundle click here and here


Lots of awesome products are retiring from the Occasions and Annual Catalogs .You defiantly don’t want to miss out on these fabulous items!!


Retiring Stampin' Up! Products


Have a great Tuesday!  As always if you have any questions about today’s card or any paper crafting project you have seen here at Westside Paper Creations feel free to contact me!  Tomorrow is the Inking Royalty Blog Hop!! So, I hope each of you will be back for that fun day!!  Go and live creatively my friends!

Peace-


Jennifer

Read More

Posted by on May 14, 2018 in Blueberry Burst, Blueberry Bushel, Faux Batik, Rooted In Nature, The Creative Way, The Creative Way -May 2018, Tranquil Textures, Tranquil Tide | 1 comment

Rooted In Nature Faux Batik

The Creative Way – A Product Feature

May’s The Creative Way – A Product Feature is all about Rooted In Nature Stamp Set! I have really enjoyed creating with this set. It lends itself to techniques (including Faux Batik, sweek), different styles, and is beautiful!!! What more can you ask for out of a stamp set!!

The first post in this series shares a lot of my thoughts about the Rooted In Nature Stamp Set and the Nature’s Poem Suite that Rooted In Nature  is apart of! You can find that post here

For day 2! 

For Day 3!

Rooted In Nature Stamp Set

Rooted In Nature Stamp Set

Faux Batik

Today’s card features a very unique technique, Faux Batik.  I love this technique so very much. And today I added so little extra to the technique!  By adding heat embossing to the finished Batik. Making masculine cards are a challenge for me.  I love flowers, stripes, colors, and other girl things.  The Rooted In Nature (146479) stamp set makes masculine cards a breeze!!

Faux Batik is quite simple.  There are a few steps but, each one is easy enough!  The first step is to pick your stamp.  The second thing you want to do is heat emboss the image onto a piece of tissue paper. Then, layer the tissue paper over shimmery white paper.  Using a baby while add ink to the tissue paper.  Pressing down making sure the tissue is thoroughly inked.  Then gently lift the tissue to reveal the batik image.

A all occasions card featuring Faux Batik for The Creative Way

  • The first step was to do the Faux Batik.  For the Batik I used Tranquil Tide and Blueberry Bushel. You can learn more about this process here.
  • After finishing the Faux Batik process I used my Stamp-A-Ma-Jig to stamp and heat emboss the tree.  This is what give the light shadow around the image.  The embossing is copper.
  • The next step was to add texture!  Copper Thread, Blueberry Bushel paper, leaves, and Leaves Trinkets (146343)
  • The final step was to add a strip of Tranquil Textures Designer Series Paper (146331)  and Copper Foil (142020)

Did you notice that the card base was the new Merry Merlot! This awesome color was added to the neutrals collection!  I adore this new neutral!  I have so enjoyed sharing. Rooted In Nature with you during May’ The Creative Way! 

Each of your comments makes me smile! Please, comment HERE.


The Share What You Love bundle is jammed packed of stamping wonderfulness for every card maker or paper craftier out there!!! This bundle is only available for a limited time

Share What You Love Bundle

  • Bundles are exclusive to the suite early release and will no longer be available after May 31, 2018. Individual items from the Share What You Love suite will be available when the 2018–2019 annual catalog is released on June 1, 2018.

If you would like to see Cards with this bundle click here and here


The Faux Batik technique is loaded of fun!  You can learn more about the technique here.  Then you can see other cards featuring the technique here, here, and here.  If you give this technique a try please tag me on social media or share via email. I would love to see what you create! #westsidepapercreations


Lots of awesome products are retiring from the Occasions and Annual Catalogs .You defiantly don’t want to miss out on these fabulous items!!

Retiring Stampin' Up! Products


Have a amazing Monday!  I hope each of you have a moment to be creative!

Peace-

Jennifer

Read More