Pages Menu
Categories Menu

Posted by on Feb 21, 2018 in annual catalog stamp sets 2017-2018, blog hop, Coloring Tools 2017, Happiest of Days, InKing Royalty Blog Hop, Layering Ovals, Layering Squares, Occasions Catalog 2018, Petal Passion, Stampin' Blends, Stiched Shapes, They Say It's Your Birthday | 23 comments

You say it’s your birthday….

Happiest of days! The Inking Royalty blog hop is here!!! And we are celebrating Birthdays!!

Welcome to InKing Royalty’s February Blog Hop! Today’s Blog Hop today is filled to the brim with projects that celebrate birthdays. The opening line from The Beatles’ “Birthday” song ran through our heads as we joyfully created the birthday-themed creations we share with you today.  After you read my post, I hope you’ll hop over to the next person on the list at the base of this post.

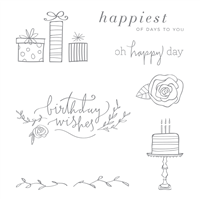
My favorite birthday set is Happiest of days  So, of course I had to use it today for the blog hop!!! I love the sweet feel of this set! It is also perfect for coloring! Witch makes me very happy ?

There is so much wonderfulness in this set! The adorable cake! The sweet presents! And the extra elements! Not to mention how perfect the sentiments are!

  • Using Stampin’ Blends I colored the dots in the designer series paper, the paper doily, the flower, and the leaves .
  • The next step was to add texture by adding layers of ribbon, bakers twine, and paper doily.
  •  Finally the sentiment is popped up with the layers of ovals!

I decided that because we were celebrating birthdays that I would decorate a matching envelope!

The decorated envelope brings all the happiness of the Birthday moment to reality!

The second card, I decided to do a little extra coloring to completely change the look of the designer series paper.  The Petal Passion Designer Series Paper is perfect to alter with color.

This paper is a must have from the Occasions Catalog! I love it as is! But, it is also loads of fun to add color to the paper making completely unique for your card!!

  • By coloring the background pool party it completely changes the feel of the Designer Series Paper
  • The layers of texture add a Vintage feel to the card
  • The final delicate touch was to add  the Tutti Frutti sequins

Here again I used some of the extra elements from the stamp set to make a super special envelope!

Thank you for stopping by today.  I hope you’ll hop along to the next stop on the blog hop, Candy Ford at Stamp Candy There’s lots of inspiration to be found in this group – and you don’t want to miss it!

Each of your comments makes me smile! Please, comment HERE.

​Thank you for hopping along with us. If you get stuck during the Blog Hop, please use this line-up as a guide:

  1. Brian King at Stamp with Brian
  2. Julie DiMatteo at The Paper Pixie
  3. Sue Jackson at Just Peachy Stamping
  4. Nina King at InkPaperSequins
  5. Jackie Beers at Blue Line Stamping
  6. Pam Morris at Tap Tap Stamp
  7. Jennifer Spiller at Westside Paper Creations
  8. Candy Ford at Stamp Candy
  9. Rachael Shedeed at Bluebonnet Stampin’
  10. Lisa Pretto at InkBig Academy Stamps
  11. Imogene Thomas at MomoMakes.com
  12. Robbye Hamilton at Miss Hammie’s Crafts
  13. Shawn de Oliveira at Shawn Stamps

I am so glad that each of you stopped by today!!!  I know you will enjoy the rest of the Birthday Celebrations throughout the Royal Blog Hop!!!

Peace-

Jennifer

Read More

Posted by on Feb 14, 2018 in annual catalog stamp sets 2017-2018, Copper Embossing Powder, Heat Embossing, Pal's Blog Hop | 7 comments

Vertical Greetings

Welcome to the Pals February 2018 Blog Hop. Our theme this month is “Case the Catty”. The Stampin’ Pretty Pals will copy or remake projects from any of the current Stampin’ Up! catalogs and brochures. After all, who doesn’t CASE (Copy and Share Everything) once in a while. You may be just starting or hopped over from another Pal. In either case you’ll find the line-up toward the end of my post to help you move along.

I was thinking about exactly what card I wanted to CASE. And decided on a card in the occasions catalog . I love the bright colors and the gradient look with the heat embossing!

In my interpretation of the card, I completely changed the colors.  I did used the technique with the blends to create my background . And the card was turned on its side . And instead of a white card base with a little texture added by stamping .I used the Tutti-Frutti notecards available during Sale-A-Bration .

I love these patterned notecards and envelopes!  I love even more that they are FREE with a $50 purchase.  Yeppie!!!!

  • The gradient background was created with Stampin’ Blends . I used Night of Navy, Bermuda Bay, and Pool Party. This technique is very easy to create .I just simply colored on Whisper White paper each color using the brush tip and overlapping the colors .
  • After the background was created, I stamped the flower-pot from Vertical Greetings with versamark. Then I heat embossed it with copper embossing powder.
  • The just because was heat embossed in while on Night of Navy card stock
  • The final touch was adding the Night of Navy and Calypso Coral Enamel Shapes

Each of your comments makes me smile! Please, comment HERE.

Thank you so much for hopping with the Stampin’ Pretty Pals today. Please take a minute to mark your calendar for our next hop on March 14, 2018. Now hop along using the Blog Hop Line-up below. Don’t forget to leave us a comment. We really like that.

  1. Mary Fish at Stampin’ Pretty
  2. Debbie Mageed at Secret Stamper
  3. Su Mohr at Aromas and Art
  4. Jennifer Michalski at Stamping Serenity
  5. Beth McCullough at Stamping Mom
  6. Rachael at Bluebonnet Stampin
  7. Lisa Ann Bernard at Queen B Creations
  8. Peggy Noe at Pretty Paper Cards
  9. Stesha Bloodhart at Stampin’ Hoot!
  10. Jackie Beers at BlueLineStamping
  11. Shannon Jaramillo at Shannon Kay Paperie
  12. Rosanne Mulhern at Heartfelt Stamping
  13. Jennifer Spiller at Westside Paper Creations
  14. Linda Suarez at All Night Stamping
  15. Pamela Sadler at Apron of Love
  16. Corinne Blake at The Creative Compendium
  17. Wendy Klein at DogGone Delightful Stampin’
  18. Julie DiMatteo at The Paper Pixie
  19. Tricia Chuba at ButterDish Designs
  20. Sara Hicks Stuart at Sentiments by Sara

Thanks for stopping by today! I hope you enjoy all the creations during the blog hop! Go and be creative my friends

Hugs-

Jennifer

Read More

Posted by on Oct 18, 2017 in Coloring Tools 2017, Holiday Catalog 2017, InKing Royalty Blog Hop, Painted Autumn, Painted Harvest, paisley and Posies | 9 comments

Thankful Thoughts with the Inking Royalty

Welcome to InKing Royalty’s October Blog Hop!  There are so many ways to say, “Thank you!” – today’s blog hop is filled with projects that share our gratitude.  Stampin’ Up!’s catalogs (both the Annual Catalog and the Holiday Catalog) are filled with so many fun products that help us show our gratitude – and we are excited to share our creations with you today.  After you read my post, I hope you’ll hop over to the next person on the list at the base of this post.

There are so many things in life to be thankful for, friends, family, a job you love, having time to create.  My Inking Royalty friend are some of my most cherished friendships. Living the creative life connects us in a truly unique way. We share what we have made with each other, we encourage each other,  we support each other, and we celebrate accomplishments with each other! The Royals are truly awesome people. I have said many times before that one of the things I love most about the card making world is the amazing sense of community.

One of my most recent purchases was the all New Stampin’ Blends (alcohol markers) and the Color Me Happy Project Kit (Available Nov.1)   The Stampin’ Blends are a must have coloring tool. And the new Limited Time, Color Me Happy Kit and Stamp Set are just awesome.  I loved one of the card designs so much I decided to CASE it today!

  • I love the simple design with the diagonal cut paper
  • I love the touch of metallic
  • And I adore the pretty envelopes

I decided to take these elements and make them into two cards for you today! For the first card I used the Painted Autumn Designer Series Paper and the Painted Harvest Stamp Set.  Both of these are perfect for fall cards.

  • The colors used are Cajun Craze, Peekaboo Peach, Chocolate Chip, Sierra Sand, and Soft Suede
  • For the touch of metallic I used copper foil paper.
  • To make the diagonal Designer Series Paper, I cut a piece of the Painted Autumn paper to 4 by 41/4 inches. Then I cut from one side to the point of the paper on the opposite end.

  • For the envelope I used the Painted Autumn Designer Series Paper on the flap.
  • The Painted Harvest stamp set was used on the form of the envelope

There are many “mistakes” in this card and the envelope. The stamping is most definitely not perfect. But, I decided to share it with you as is. So you would know stamping and creating is not an art of being perfect! It is about creating something to share with others.  The recipient will never know you stamped the acorns a bit two far apart or that the sunflowers are not aligned up right.  They are going to see a beautiful card!

The next card, I decided to flip the diagonal, use stamps that I could color with the blends to create my own designer series paper, and change-up the size of the sentiment.  You can still see the inspiration in the card design. It just takes CASEing a little further from an exact copy.

  • The colors used are Whisper White, Night of Navy, So Saffron, and Silver Foil
  • On the Whisper White I stamped in tuxedo black memento ink the Paisley and Poses stamps
  • They are colored with the new Stampin’ Blends. Colors used Light and Dark Night of Navy, Light Daffodil Delight, and Light Smoky Slate
  • I used the fine tip nib with a very small circular motion to create a smooth coloring with the Stampin’ Blends. Then when I had very little space to work I used a very light touch when adding color.

  • The envelope is also stamped with the Paisley and Poses stamp set.  Then colored with the Stampin Blends
  • A strip of silver foil was added to the top of the flap
  • When coloring with the blends on the thin envelope paper, I use a piece of scrap paper between the layers of the envelope

I can’t tell you how much I have enjoyed using the Stampin’ Blends. They are awesome in coloring. They make blending two colors together a breeze. Or you can use them as single colors like I did to get an even colouring!  I’m so excited about having alcohol markers in Stampin’ Up! colors. These wonderful markers will be available November 1!!!

Each of your comments makes me smile! Please, comment HERE.

Thank you for stopping by today.  I hope you’ll hopalong to the next stop on the blog hopDenise Hoepfner at The Mountain Magpie There’s lots of inspiration to be found in this group – and you don’t want to miss it!

​Thank you for hopping along with us. If you get stuck during the Blog Hop, please use this line-up as a guide:

  1. Brian King at Stamp with Brian
  2. Jackie Beers at Blue Line Stamping
  3. Sue Jackson at Just Peachy Stamping
  4. Shawn de Oliveira at Shawn Stamps
  5. Jennifer Spiller at Westside Paper Creations
  6. Denise Hoepfner at The Mountain Magpie
  7. Robin Myren at Songbird Designs by Robin
  8. Lynn Kolcun at Avery’s Owlery
  9. Karen Browning at KarenZBrowning.com
  10. Robbye Hamilton at Miss Hammie’s Crafts
  11. Julie DiMatteo at The Paper Pixie
  12. Racheal Shedeed at Bluebonnet Stampin’

​Below is a about the  Stampin’ Blends! Be sure to check it out!

Thanks for stopping by on this hop day! I hope that you enjoy the amazing creativity in this group! I promise the Inking Royalty are the best group ever!

Peace and love my creative friends-

Jennifer

Read More

Posted by on Oct 2, 2017 in annual catalog stamp sets 2017-2018, Coloring Tools 2017, Remarkable You, Remarkable You, Thankful Thoughts, Watercolor, Watercolor pencils, Watercolor pincles | 0 comments

Remarkable You

Sometimes I like to give myself a challenge! So when I set out to make this card, I challenged myself to work on making a collage style card!  I love the look of this style of cards.  So, I decided to give it a try! This all started when I was watercoloring some leaves from Remarkable You Stamp Set!  I love this set so much. And it had been neglected lately by me! So I was watercoloring and thanking about what I could make ….

Remarkably You

Like I said, I adore this beautiful set! It is just perfect in every way. The bold graphic feel. The ease of coloring. And so on…

  • The leaves were stamped on watercolor paper with Basic Black Ink. Then watercolor with the Old Olive pencil and a aqua painter
  • The pink layer is watercolor paper painted with the Calypso Coral pencil. Creating a gradient effect.
  • The doily is lightly water colored with the Bermuda Bay pencil.
  • The sentiment is from Thankful Thoughts stamp set. And is stamped and Basic Black Ink on Very Vanilla.

The card base is 5 1/2 by 5 1/2 square card in Bermuda Bay.  To make a square card use a 8 1/2 by 11 sheet of card stock. Cut it at 5 1/2 inches on the 8 1/2 side. Then score at 5 1/2 on the 11 inch side. The next layer is 5 3/8 by 5 3/8 inches in Powder Pink. The Basic Black Layer is 5 by 5 inches.  The Wood layer is 4 7/8 by 4 7/ 8 inches.

Each of your comments makes me smile! Please, comment HERE.

We have lots going on right now in the Stampin’ Up! world. Designer Series Paper is buy 3 get one FREE!!! The Wood Texture paper used today is apart of the sale!!!

There is also a sale. Celebrating World Card Making Day!  There are some awesome stamp sets in the sale. Also when you buy a Fast Fuse adhesive you get two refills for FREE!!! The More Cards and Envelopes are part of this awesome sale!!! everything in the sale is 15% off!!!

Have you heard that Paper Pumpkin in October and November will coordinate together for all your Holiday Crafting!!

  • To receive October’s kit, customers must subscribe at paperpumpkin.com by 11:50 PM (MT) on October 10.
  • Remember, the October and November kits coordinate but they also stand alone. You DO NOT need both kits to create a complete project.

Below is a list of products used!  If you have any questions please feel free to contact me.

Supply List

 Thank you for stopping by! I love sharing with you guys! I hope each of you have a amazing Monday. And that you have time to be creative!!!
Peace my friends-

Jennifer

Read More

Posted by on Sep 26, 2017 in annual catalog stamp sets 2017-2018, Happiest of Days, Lemon Lime Twist, Season of Whimsy, Teeny Tiny Wishes | 1 comment

Happiest of Days

I am back today with a quick and quick and easy little card featuring the Happiest of  Day stamp set! I love the sketched look of the stamps  and that it is super sweet!  It is just one of those sets that a girly girl loves.

Oh Happiest of Days stamp set

This set is perfect for those who like to color! Or add doodling to a card.  I have seen lots of doodling lately on cards. It is defiantly an on trend thing! And it adds lots of personality to your handmade cards.  Rambling Rose Studio is amazing at doodling. You should definitely check out Billie’s work! Her cards are awesome and she will defiantly make you want to try your had at doodling.

  • Everything is stamped in basic black.
  • The three packages were colored with prisma color colored pencils. The colors used were Chartreuse (pc989), vert printemps (pc913), and eaugepále (pc1089)
  • The corner stamp is from the Host Set in the Holiday Catalog, Season of Whimsy
  • The last thing to do was add the doodling lines! I used a zig millennium 05 to do this.

The card base is a 4 bar size. Stampin’ Up! makes great 4 bar note cards and Envelopes. These are perfect for little cards like this. The Lemon Lime Twist layer is 3 3/8 by 4 7/8 inches.  The stamped Whisper White layer is 3 1/4 by 4 3/4 inches.

You guys know I love to decorate my envelopes.  So I added a little doodling to it as well and a Happy Birthday from Teeny Tiny Wishes

Each of your comments makes me smile! Please, comment HERE.

I’m going to leave you with an up close of the coloring. It was quite simple to add just a little bit of shading by layering the three colors on top of each other! Also, adding thin layers of color helped to build the color up!

Below is the supply list! Happy Stampin’ Remember you will also need a fine point pen for the doodling. And a way to color this awesome set!

Thank you for stopping by today! I hope each of you have a wonderful Tuesday!  Stay creative my friends!

Peace-


Jennifer

Read More