Pages Menu
Categories Menu

Posted by on Sep 11, 2017 in Coffee Cafe', Everyday Label Punch, Holiday Catalog 2017, Labels to Love, Merry Cafe', Painted Autumn | 4 comments

A pouch box and a mini treat pocket

This is such a fun time of the year! Football, pumpkins, hot tea, and of course coffee.  I decided to celebrate the upcoming fall season with two sets of cards and a pocket box to hold them. These will make great little gifts for friends! I can’t wait to share them with my coffee loving friends. While I had my supplies out, I also made a mini pocket for at treat such as Ghirardelli squares.

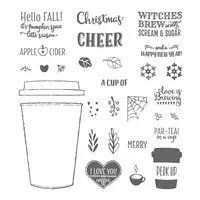
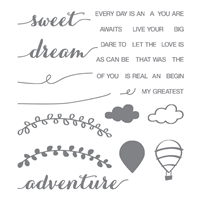
To make these pocket boxes I decided to use the Merry Café set in the Holiday Catalog. This set is just wonderful! It is full of goodies for fall café cards and Christmas café cards. It is jam-packed with sentiments, and little stamps to decorate your coffee/tea cups up! I love all the detail stamps included in this set.

Merry Café

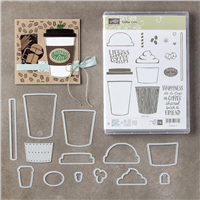
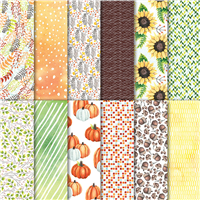
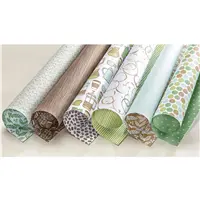
This super cute set was paired with the Coffee Café stamp set and the  Painted Autumn Designer Series Paper. This paper is quickly becoming a favorite! I seem to be reaching for it all the time! I just love the patterns in this paper

The card pocket is a case from fellow demonstrator, Kelly Acheson at A Stamp Above. When I saw Kelly’s pocket I thought it looked familiar, that’s because my friend Julie DiMatteo at the Paper Pixie had made a mini version of the pocket fold.  She is an origami genius!! I love all of her boxes and mini projects.

I have several pictures for you today of the process of making the pocket fold box.  But, make sure you check out Julie’s and Kelly’s blog post. They both have great videos that show you exactly how to make the card. Kelly’s pocket fold box.  Julie’s mini pocket treat holder.

The first thing I did was make a template that I can keep of this pocket box. The card pocket box and the treat pocket box are made exactly the same. They are different sizes and held together differently!  So, I gathered my supplies which includes 12 x 12 paper, multipurpose glue, a bone folder, and a score board

After you have gathered your supplies then you will want to cut your paper down to 7 1/2 by 12 inches. Then you will use your score board to do some scoring. 


You will score at

  • 1 7/8 and 5 5/8 on the short side (7 1/2)
  • 5 5/8 and 6 3/8 on the long side (12)

You will want to burnish each score line with the bone folder.  After burnishing you will want to fold it like above.  Then you will take your finger and hold it at the crease where the score line meats the folded edge.

With your other hand you will pull back the score line to line up with the folded paper. And score on the diagonal line created.

You will want to do this process on all four sides. So that you end up with something that looks like the below picture.

This shows you the basic form of the pocket box.  All that is left is to make the top of the box and to glue the sides down. The top of the box is as follows.

  • The paper is cut at 4 3/4 x 3 3/4 inches.
  • Score at 1 inch and 3 3/4 inches on the long side (4 3/4 side)

You will want to burnish the two score lines. Then you will glue down one of the scored sections.

I used my template to decide which way to cut the designer series paper. In this case the florals were cut so that they run up the top of the pouch box. So the 4 3/4 inches side is the side and the 3 3/4 edge was the top of the paper.

The second scored section is glued in between the layers of the pouch box. This connects your top to the actual box.

To connect the lid with the box use multipurpose glue and glue down the flaps of the box. Be sure not to add glue to the section that makes the pouch.  You will finish the pouch by glueing down each long fold as shown above.

Here is a picture of the inside of a completed pouch box!

Each of the card pouches will have four matching card on the very vanilla Notecard and envelopes.   I also decorated the outside if the pouch boxes

Tomorrow I will share more about how I made these adorable little note cards.

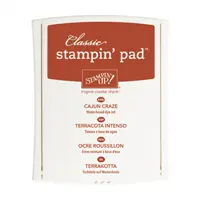
  • The colors used are Cajun Craze, Soft Sky, and Chocolate Chip
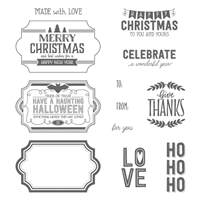
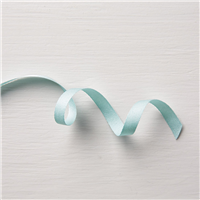
  • The box is decorated with the linen thread, the Labels to Love stamp set (and everyday label punch) , and the heart in Coffee Café.

  • The colors used are Cajun Craze, Daffodil Delight, and basic black
  • The sentiment is from Merry Café. how fun is that sentiment. Bellow fall the pumpkin spice latte season
  • The Daffodil Delight layer was added by making a second top to the pouch box then adding it to the original top.  I did this as an afterthought so, I did have to cut one end down so it would fit


  • The size of the mini version is made with  4 x 6 paper
  • Scored at 1 inch and 4 inch and 3 inch on the short side (4 inch)
  • Score at 2 3/4 inches and 3 1/4 inches on the long side (6 inch)
  • I used the scalloped tag topper to make the ribbon slot at the top of the card
  • The burnishing and glueing is the same as above. You just don’t have to add the top because it is held together by ribbon

Each of your comments makes me smile! Please, comment HERE.

The Holiday Catalog is here! I adore this catalog! I know you are loving it as much as I am! It is just full of awesomeness!!!

There is a super exciting stamp set available to all who place $300 order during September and October. Host a party or gather orders from your friends to reach your $300 order! You are going to want this exclusive stamp set! It is amazing!

Here is the supply list.  If you have any questions about today’s card, products used, or Stampin’ Up! feel free to email me at westsidepapercreations@gmail.com


Supply List

 I hope everyone is staying safe in the wake of the recent storms.  Happy Monday!  and I will be back tomorrow with details about the coordinating cards for the pouch boxes
Peace my Friends-

Jennifer

Read More

Posted by on Aug 10, 2017 in Brick Wall Embossing Folder, Coffee Break Designer Series paper, Coffee Cafe', Embossing, Merry Cafe' | 2 comments

Coffee Cafe’ and friends are just the best ever!

The Coffee Cafe’ Stamp Set is awesome and amazing! I love so much about this amazing and fun set. It is perfect for all those in your life that love coffee. But, It can also be used for so many other things. Like Lemon-Aid or a fun fruit drink. I have made a few different cards using this set. I thought it was time to share its full coffee glory with you!

Coffee Cafe’ Bundle

This Suite of products speaks Cafe’ everything from the colors to the stripes and circles in the Designer Series Paper. And the ribbon in the suite is just amazing. It is by far one of my favorite styles of ribbon because it is so very easy to use. The Classic Weave Ribbon is exactly what it sounds like. That classic cotton ribbon we all love.

Coffee Break

Merry Cafe’

We all love outings with friends. This is part of what makes the world a better place. Those moments with friends that are apart of who we are. I love the time I get with friends. And nothing is better than a little time talking over coffee. Well, maybe a little time stamping, coffee, and friends. Now, that’s a wonderful time being had. The Coffee’ Cafe’ has a new friend that is going to make a Big Brew in the Holiday Catalog. The Merry Cafe’ Stamp Set.This is a companion stamp set that will make everything about Coffee Cafe’ even brighter and better! Each of the stamp sets stand alone. But, they complement each other so very much! Just like true friends.

  • This fun square card is full of coffee happiness. Each coffee cup is stamped with the sketchy coffee outline from Merry Cafe’ . Then die cut with the coordinating dies.
  • The white cup is stamped with the sentiment in Pear Pizzazz
  • The cup lids are lightly colored with pool party ink using a blender pin.
  • The background right behind the cups is a watercolor wash background using Pear Pizzazz and Pool Party ink. I used very little water and heat set it between washes of color to give it a streaky look
  • The Early Espresso layer is paired with the coffee stain paper in the Coffee Break Designer Series Paper.
  • The Brick Wall Texture Impressions added interest to the background

Each of your comments makes me smile! Please, comment HERE.

The Carols of Christmas Early Release is now available for you to purchase. You are going to love this set so much. It is my must have from the Holiday Catalog. It is amazing!!! So very easy to use and just simply perfect!!! It will remind you of why you love stamping in the first place. The stamp set pairs with the Card front builder dies! These dies rock!!!! They will make every Holiday Card sing in glory!!!!

 Below is a list of items used in making today’s card. If you have any questions about the card or products used feel free to drop me an email, westsidepapercreations@gmail.com


Price: $110.00

Supply List

Thanks for stopping by today!  I hope your Thursday is filled with laughter, friendship, and coffee!!!  Let’s all try to find a moment to be creative and share what we love with others!
Peace my Friends-

Jennifer

Read More

Posted by on Jul 21, 2017 in Coffee Cafe', Dare to Dream, ink as watercolor, Lemon Zest, Tie Dye | 10 comments

Lemonade dreams

When it is a 100 degrees outside and 99% humidity my thoughts turn to refreshing dreams of lemonade.  Alabama this time of year can be brutally hot! And our humidity just makes it sticky to even walk out side. Now, I am a professed heat loving girl! But, when it get so hot with the humidity really high I just want to be at a beach with my feet in the water…or maybe on a lazing creek canoeing…or even on a float in the pool! Key is being as still as possible near water to cool off and a big glass of Lemonade!! There is just something so refreshing about  fresh lemons during a heat wave!!!  Thinking about this lead to a card that combines three Amazing stamp sets.  Lemon Zest, Coffee Cafe’, and Dare to Dream

  • Colors used are Lemon Lime Twist and Crushed Curry with a little Daffodil Delight and Old Olive
  • I’m completely obsessed with square cards right now.  This square is 5 1/2 by 5 1/2.  The tie dye panel is 4 by 4.
  • The cup is stamped in Old Olive and watercolor with Crushed Curry.
  • The Lemons and Limes are stamped in Lemon Lime Twist and Crushed Curry.  The punched out with coordinating circle punches
  • The Daffodil Delight is brought in on the Tie Dye panel.  This panel was created using a coffee filter, Lemon Lime Twist ink and Daffodil Delight ink, and baby wipes.  Just use the baby wipe to add ink to the coffee filter.  Such fun

Each of your comments makes me smile! Please, comment HERE.

Check out Instagram for a version of this card with a straw! After taking the pictures and righting everything up I decided that this card needed a straw.  Check it out on my Instagram page! While you are there, I hope you will enjoy seeing all my Christmas in July post!  Instagram @westsidepaper

I would love for you to join my team.  My stamping friends are the best.  When you join under me not only do you get to be apart of my team.  But, you will also be a member of the InKing Royalty!  The best stamping community around!!!   Stampin’ Up! has a great July Join event going on!!!  So want you join me now????  If you have any questions about Stampin’ Up! or Joining Now, please feel free to contact me at westsidepapercreations@gmail.com

Join in July, get Free products!!!  Everyone who joins in July will receive the Carols for Christmas stamp set. Don’t know that set???? It is bran new for the Holiday Catalog!!! You also get the Essentials Gift Pack. This pack includes paper snips, grid paper, snail adhesive, a bone folder, and two D stampin’ blocks.  Exclusive to Christmas in July!!

When you spend $50 in July Stampin’ Up! will give you $5 to spend in August!!!  For every $50 you spend in July!!! Let’s all say Merry Christmas in July!!!

Below is a list of products used to make this card!  If you have any questions feel free to contact me at westsidepapercreations@gmail.com

Price: $110.00

Supply List

Thanks for stopping by today!  I hope each of you have a amazing Friday!  Let’s all take a little time to be creative!!!
Peace out my Lovely’s-

Jennifer

Read More

Posted by on Jun 25, 2017 in annual catalog stamp sets 2017-2018, Coffee Cafe', Daisy Delight, Dare to Dream, Delightful Daisy | 2 comments

Coffee Cafe’ for Global Design Project #gdpo92

Being that I have worked at a Cafe’ for years that has it roots in coffee. I just had to have the Coffee Cafe’ stamp set! Let’s just say it was meant to be ? …this set is just full of everything you need to make your own cup of coffee (on a card that is)…

After looking at Steffi Helmschrott amazing card over at Global Design Project.  Then thinking most of the week about how I wanted to recreate it, I decided that the Coffee Cafe’ set would be perfect!!!

 Is this not just the prettiest card ever!  It just draws your eyes in to that jar.  The things I love most about Steffi card

  • The hand drawn feel
  • Her amazing watercolor
  • The simplicity if her card design

Be sure you stop by Global Design Project to see all the awesome cards by the Design Team and those who are playing along!

  • Stamping the image in Smoky Slate. I used this color because I wanted the edges to fade a bit as I watercolored. hoping for that hand drawn look.
  • After wetting the area inside the cup, I added Tranquil Tide and Daffodil Delight to the cup.
  • I set it aside to let this dry. After it was dry. I cut it out using the die cuts. And added the flowers from the Daisy Delight stamp set
  • The next step was to work on the background.  Stamping a texture from Timeless Texture stamp set. I added just a little water to the area and then color.  Below you can see the texture the stamp leaves… It is faint but, adds a lot to the card.
  • After the background dried I added the straw and other finishing touches

I really love this color combinations!

I have this philosophy about card making. Ant that is that layers makes everything better!! #layersmakeseverycardbetter… So when in doubt add layers!!  It was one of the first things I learned from my amazing friend Brian!!   I love this picture because it shows all the different layers on this card. Not just paper but, stamps and ink as well!

I really have been trying to do better at decorating my envelopes!!!  This envelope got a little love on the front and On the back.  The coffee rings are stamped in Smoky Slate and Daffodil Delight. The I added the little Hi that is in the Coffee Cafe’ stamp set!  On the back flap I added some Designer Series Paper.   Did I mention that this set is available in a bundle which saves you 10%.  Yeppie!!!

Below is a list of all the products used! If you have any questions about this card, please feel free to ask in the comments below.   Also, here is one last look at today’s card ☕??

Each of your comments makes me smile! Please, comment HERE.

Shop big and save!!!   We always love our host! But right now they are extra special!!!  So, when you are ready let me know!!! I am always happy to work with you. It’s a perfect time to save even more on all the NEW products!!!

The new catalog is full of Awesome New product! And some pretty amazing returning items!!

Thanks for stopping by! Hope you have a blessed Sunday! Maybe, you can squeeze in a nap and some creative goodness…

Peace out-

Jennifer

Read More