Pages Menu
Categories Menu

Posted by on May 18, 2018 in Layering Ovals, Layering ovals, Nature's Poem, Rooted In Nature, Stiches Shapes Dies, The Creative Way, The Creative Way -May 2018, Uncategorized | 2 comments

You are Wonderful!

The Natures Poem Designer Series Paper is beautiful!  I love one particular paper because of the softness of the leaves.  The paper looks like faded burlap with a soft twig and leaf pattern on top!  It is Wonderful!  This paper was my inspiration for today’s The Creative Way card!

The Creative Way – A Product Feature

Rooted In Nature Stamp Set is available in a Bundle with the Nature’s Roots Framelits Dies. (Available June 2)  Theses dies cut the trees and leaves in the set. There are also dies that make an embossed leaf. These embossed leaves are beautiful!  They add settle texture to your cards.

Nature

Rooted In Nature Bundle

The Nature’s Poem Designer Series Paper is full of Natured inspired patterns! This paper can take a wide range of cards from Masculine to soft and sweet!

Nature

Nature’s Poem Designer Series Paper

I really like how soft some of the Nature’s Poem patterns are!  Yet there are some bold patterns that compliment the softness of the leaves.  Like I said above, I particularly love this soft Mint Macaroon leafy twig pattern on top of the soft burlap pattern! It is just beautiful!

You are Wonderful

  • The first step was to use the textured leaf dies.  This is how I did that.  The first thing was to ink up the embossing die.  Then gently laying it onto whisper white. Finally embossing using the Big Shot
  • You can see on my leaves where ink was in spaces besides the vanes. But, I decided to use them anyway.  1. It is a handmade card, this adds to that feel. And 2. I think this makes it look more like nature. Imperfections are beautiful in Nature.
  • The You are Wonderful is layered using the Stitched Shapes Dies and the Layering Ovals Dies

I really love all the looks you can create from the leaves in the Rooted In Nature stamp set and the Nature’s Roots Dies!

Each of your comments makes me smile! Please, comment HERE.


  I hope you have enjoyed seeing this bonus card for The Creative Way!!  I have so enjoyed sharing Rooted In Nature with you! Also seriously, the Tempting Turquoise ink is amazing for watercolor!! If you like this look I highly suggest you purchase it now!!

The first post in The Creative Way  series shares a lot of my thoughts about the Rooted In Nature Stamp Set and the Nature’s Poem Suite that Rooted In Nature  is apart of! You can find that post here

For day 2! 

For Day 3!

For Day 4

For Day 5


The Share What You Love bundle is jammed packed of stamping wonderfulness for every card maker or paper craftier out there!!! This bundle is only available for a limited time

Share What You Love Bundle

  • Bundles are exclusive to the suite early release and will no longer be available after May 31, 2018. Individual items from the Share What You Love suite will be available when the 2018–2019 annual catalog is released on June 1, 2018.

If you would like to see Cards with this bundle click here and here


Lots of awesome products are retiring from the Occasions and Annual Catalogs .You defiantly don’t want to miss out on these fabulous items!!

Retiring Stampin' Up! Products


Happy Friday! I hope each of you have a great weekend! Go and live creatively my friends

Peace-

Jennifer

Read More

Posted by on Mar 14, 2018 in A Good Day, Banners for You, Coloring Tools 2017, Die Cuts 2017-2018, Flying Home, Layering Circles, Layering Circles, Layering Ovals, Layering ovals, Layering Ovals, May Flowers, May Flowers Die, Perennial Birthday, Stampin' Blends, Stiches Shapes Dies, Tutti Frutti Card Bases, Uncategorized | 9 comments

Spring has sprung…

Spring is just around the corner! Here in Alabama the trees are beginning to bloom and all the early spring flowers are up, daffodils, tulips, and others.  We had a warm February that got things rolling towards an early spring .But, old man winter is not through with us yet . The mornings have been cold (Alabama cold, mind you) and crisp . The birds are chirping there happy songs and the Pals are hopping along .


Welcome to the Pals March 2018 Blog Hop. Our theme this month is “Spring has Sprung”. The Stampin’ Pretty Pals will inspire you with Spring or Spring-related projects. You may see floral, Easter or other general Spring-inspired designs. You may be just starting or hopped over from another Pal. In either case you’ll find the line-up toward the end of my post to help you move along.

I love this time of the year when the birds start chirp their happy song.  It means Spring is right around the corner! One stamp set in the Occasions Catalog brings all the spring Birds home!  Flying Home makes me think about all the migrating birds flying back to their favorite backyard bird houses.

Flying Home Stamp Set

I think this may be the sweetest stamp set I have ever seen!   It just screams cute!!  In some ways it is very retro . In other ways it has a modern feel . So, as it once was said… what once was old is new again!

  • The bird houses were stamped with memento ink. Then colored with the Stampin’ Blends. Often I use my Prisms Color Markers along with the Blends .But, lately I have been trying to just use my Blends .
  • The card base is from Sale-A-Bration .The Tutti Frutti card bases and envelopes!  These card bases and envelopes are amazing! I love the colors . And the patterns make it easy to add anything you want on top!
  • The Hello is from Banners For You

The next two cards are actually the inspiration to create the card above as a clean and straight lined version!  Not all cards have to have lots of texture to be beautiful!  I love the straight forward version above as much as I love the full of layers and texture versions below!!!   All three cards could be made either way and still be beautiful!

  • Layers of texture are  like the branches, twigs, and twine that birds gather to build a nest. Layers of twine, ribbon, and vellum come together to build a backdrop for a sweet nest of birds
  • The stamped image is once again colored with the blends . To be honest, this would be a great set to also color with the. Stampin’ Write markers . The images for the most part are small enough that streaking is not an issue if you work fast . So, please do not feel that you must have Stampin’ Blends to color these images
  • The Hello Friend is from the Stamp Set A Good Day!

  • Yet again lots of layers and texture
  • The flower and the vellum leaves are from the dies May Flowers .These dies are perfect for all your Spring crafting needs
  • The flower and the vellum leaf are steeped up a bit .  I used my Stampin’ Blends in the light Daffodil Delight to quickly color both .
  • The sentiment is from the Perennial Birthday Stamp set . It was to long for the space .So, I simply cut it in half . That was after trying several , and I mean SEVERAL different options . Finally, yesterday morning it just came together like magic .
  • The final touch was to add the enamel shapes

I always live decorating my envelopes! The Tutti Frutti envelopes are so pretty it really does not take much to add a little something special to them.  I used the little small birds and butterfly’s in the Flying Home set to add the extra touches for my envelopes

Each of your comments makes me smile! Please, comment HERE.

Thank you so much for hopping with the Stampin’ Pretty Pals today. Please take a minute to mark your calendar for our next hop on April 11, 2018 for our Family First Hop. Now hop along using the Blog Hop Line-up below. Don’t forget to leave us a comment. We really like that.

Blog Hop Line-up:

  1. Mary Fish at Stampin’ Pretty
  2. Rae Harper-Burnet at Wild West Paper Arts
  3. Wendy Klein at Doggone Delightful Stampin’
  4. Corinne Blake at The Creative Compendium
  5. Linda Suarez at All Night Stamping
  6. Jackie Beers at Blue Line Stamping
  7. Debbie Mageed at Secret Stamper
  8. Brian King at Stamp with Brian
  9. Stesha Bloodhart at Stampin’ Hoot!
  10. Su Mohr at Aromas And Art
  11. Lori Pinto at LollyPop Paper and Ink
  12. Peggy Noe at Pretty Paper Cards
  13. Beth McCullough at Stamping Mom
  14. Jennifer Spiller at Westside Paper Creations
  15. Nina King at Ink Paper Sequins
  16. Rosanne Mulhern at Heartfelt Stamping
  17. Karen Hallam at Karen’s Stampin’ Habit!
  18. Sara Hicks Stuart at Sentiments by Sara
  19. Lisa Ann Bernard at Queen B Creations
  20. Pamela Sadler at Stampin Pink Rose

Thank you for stopping by! I love sharing and will be back soon!  I hope each of you will hop along with us today! Please feel free to leave comments with those of us who you especially like there work! We, I know I do, love hearing from you guys!!!

Peace-

Jennifer

Read More

Posted by on Sep 20, 2017 in blog hop, Cat Punch, Die Cuts 2017-2018, InKing Royalty Blog Hop, Layering Circles, Layering Ovals, Layering Squares, Spooky Cat Bundle, Spooky Night, Tricked Out Treats | 13 comments

Tricked out Treats with the Inking Royalty

Welcome to InKing Royalty’s September Blog Hop!  Today’s Tricked Out Treats Blog Hop is filled with spooky, fun projects for Halloween.  We are excited to share our creations with you today and hope these projects inspire you.  After you read my post, I hope you’ll hop over to the next person on the list at the base of this post.

I am so excited that we have the uber talented Lydia Fiedler joining us on the hop today! I adore Lydia as a friend and her artsy talent!  She is one of my favorite sources of crafty goodness! Welcome, Lydia! And thank you for joining us today for the Royal Hop!!  She gets to be a Royal for a day!! Yeppie!! The fabulous Lisa Pretto is also joining us!! I adore Lisa and all that she does for the Stampin’ Up! Community!!! truly we have the most amazing ladies with us today!!!  Huggs and Kisses to you both!

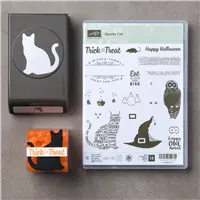
I decided to step out side my normal card box and make a treat holder for you guys! But, then I could not help myself and made a card to go along with the treat box!  For both projects, I used the Spooky Cat bundle and the Spooky Nights Designer Series Paper.  I can’t begin to tell you how much I like the cat punch!  It is probably my favorite punch in a very long time! I am just reaching for it all the time.

Spooky Cat Bundle

The Spooky Night Designer Series Paper coordinates with the punch. And is perfect for all your Halloween Crafting!

Spooky Night Designer Series Paper

The pumpkins and hats are adorable and fussy cut super easy.  The polka dots are just adorable. And the cats are just the right size to punch with the cat punch!!!

I surfed through some of my favorite blogs that make 3-D items a lot. And came across a box that was made from a 6×6 piece of Designer Series Paper over at Pootles.   It is the perfect size for a “fun size” candy bar. Witch ment it was just right for a Halloween treat!

Each box was made with 12 x 22 Designer Series Paper. You get 4 boxes per sheet of Designer Series Paper. Then I used the Spooky Cat bundle to decorate the boxes.

Here’s the scoring and cutting info:

  • the paper should be 6×6
  • Score at 1 1/2 and 4 1/2 inches
  • On the other side score st 1 1/2 , 2 1/4, 3 3/4, and 4 1/2
  • Burnish all score lines
  • On the side with four score lines you will cut up to where it intersects with the other score line
  • Then you will cut away a few sections. (See below)

Above is a picture of the template that I made.  You will want to cut away the parts that I have scribbled on. Also, the Black lines are the score lines. So you can see you don’t cut away the entire flap  So that you end up with something that looks like this.

The next step is to add glue to the sections that were left after cutting!  I used the fast fuse for this. It is very rare that I reach for this over the multipurpose glue. In this case fast fuse was perfect!

TRICKED OUT-

I used a piece of leftover backing from the multipurpose adhesive sheet.  The tape in fast fuse will not stick to the backing. So, it is perfect for when you want to run the tape from edge to edge of a piece of paper.

I added fast fuse to the orange sections that are folded over. All that is left is to put the box together.  The bottom two orange sections glue to the long tab that is in between them.  This makes the box. The top section with fast fuse adheres to the top tab.  This makes the top.  You want to repeat the process on both sides.

This is such a fun box with designer series paper. I love how when you open it the inside paper is just a pretty as the outside.

The hinged lid makes this box unique. Now, you can use a 1/2 inch circle punch to add a little notch to the bottom of the lid making it easy to open.  I opted not to.  Also, if you have any questions about making the box feel free to contact me via email.  Pootles has a wonderful video on how to make this box.

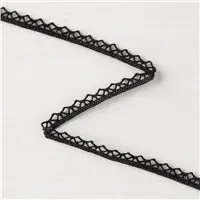
Now, y’all know I couldn’t let the day go by without showing you the cat!  Is he not adorable. Paper crafting could not get any easier.  The fun scarf is the Vintage Crochet Trim. I love this trim! It tied just like a real scarf!! How cool is that!!!

  • The cat’s ear peeking out is something I have been thinking about ever since I saw the hats.  I used a exact-o knife to cut a slit for the ear to peep out
  • The orange layer is embossed with the quilt top texture embossing folder. This folder is quickly becoming a favorite!
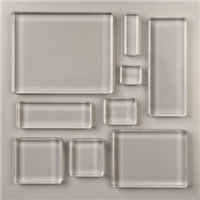
  • The stitched layering dies make a plain square something special

Each of your comments makes me smile! Please, comment HERE.

Thank you for hopping along with us. If you get stuck during the Blog Hop, please use this line-up as a guide:

The Holiday Catalog is here! I adore this catalog! I know you are loving it as much as I am! It is just full of awesomeness!!!

  1. Lydia Fiedler at Understand Blue
  2. Brian King at Stamp with Brian
  3. Jennifer Spiller at Westside Paper Creations
  4. Julie DiMatteo at The Paper Pixie
  5. Lisa Pretto at Ink Big Academy Stamps
  6. Shawn de Oliveira at Shawn Stamps
  7. Lynn Kolcun at Avery’s Owlery
  8. Sheryl Sharp at Sharp Notes by Sheryl
  9. Robin Myren at Songbird Designs by Robin
  10. Racheal Shedeed at Bluebonnet Stampin’
  11. Jackie Beers at Blue Line Stamping
  12. Karen Browning at Karen Z Browning
  13. Candy Ford at Stamp Candy


There is a super exciting stamp set available to all who place $300 order during September and October. Host a party or gather orders from your friends to reach your $300 order! You are going to want this exclusive stamp set! It is amazing!

Here is the supply list.  If you have any questions about today’s card, products used, or Stampin’ Up! feel free to email me at westsidepapercreations@gmail.com


Supply List

 Thank you for stopping by today.  I hope you’ll hopalong to the next stop on the blog hop, Julie DiMatteo at The Paper Pixie. There’s lots of inspiration to be found in this group – and you don’t want to miss it!

My Tricked out tip for you today I learned from watching way too many you tube videos. The always fabulous Jennifer McGuire gave the adhesive sheet tip in a video I was watching! It really pays to be addicted to card videos.  Anyway, try it out for yourself.  It is really useful when lining envelopes.  And for boxes like today!

Peace and happiness my friends-

Jennifer

Read More

Posted by on Nov 13, 2016 in In Colors 2016, Layering Ovals, Layering Squares, On Stage, Seasonal Decorative Mask, Thankful Thoughts | 1 comment

Thankful Thoughts for On Stage Swaps


On Stage was so much fun, I’m still not over the excitement.  I am super excited about the new catalog!  You are just going to love it :> Promise!!!! I am greatly missing all my friends.  So, I thought I would share just a few more pictures with you from that day.  How wonderful are all those smiles.  Just love these ladies so much.  Kim, Imogene, Pam, and Katie.

fb_img_1478460498508

I got to sit with most of these ladies during the day. Also, included in our table was Bobby and Shawn.  (I missed getting a table shot, so you will just have to imagine they are in this group.  We chatted about what we liked, what excited us the most, lost samp blocks, found stamp blocks, all in all fun!!! I really enjoyed seeing what excited each person the most from the upcoming Occasions Catalog.  Everyone was different, which I loved seeing.   The day was also filled with lots of swag.  20161105_143132

This is Katie with her New Stamp Set

20161105_143144

And Shawn

20161105_145101

And Bobby with her amazing smile.

One of the things I loved most about On Stage was everyone’s smiles.  We all mingled around and swapped cards with each other.  This was lots of fun for Kim.  I let her swap my cards. I know, Right????  Everyone was swapping early in the morning and I just was not awake enough to engage with people yet.  Thought, throughout the day people were stopping buy tables swapping cards.  How fun!!!!  For my swap cards I did a little retro technique with a modern twist.  I will fully confess that this technique was not my idea.  My friend, Lydia at Understan Blue did this very technique several weeks ago.  When I saw the video, I just know I had to try it!

20161110_145709

I just love how the colors mix using shaving cream, a credit card, ink, and a stencil.  I was so excited about getting to play with shaving cream that I stole Mike’s Barbasol.  And about 1/2 way through the day I was really wishing it was unscented.  Waite and buy some unscented shaving cream!  Trust me…. When I do a technique like this I make loads and loads of paper.  It just is not worth getting everything out just for one card.  And besides you will be having so much fun that stopping will be the real issue.  I followed Lydia’s instructions as well as I could.  It is best to just try  it out and see.  Then go from their.  After the shaving cream got really mixed up.  I would switch over and make some marbled cards using the shaving cream technique we all know and love.  I really like how the shimmery white paper reacts with the ink.  It just adds a little something something.

The colors were really interesting to watch as they  would go from really bright and bold to soft and muted.  Both were beautiful.  I used Crushed Curry, Dapper Denim, and Cajun Craze.  I tried to keep the Dapper Denim and Cajun Craze from mixing too much.      Once the shaving cream turned a brown color I quit using it.  And started over.  When making a bold paper it is best to keep the rest of the card clean and simple.  I really wanted the stenciling to shine.  So I finished the card off with the Layering Ovals, some card layers, and a simple scripted thank you.

I love how the colors soften as you work with the shaving cream.  That minty color is amazing!!!!!20161112_102243

This card I scraped off the shaving cream   immediately after stenciling .  You can see how it makes the background  look  atmospheric. 

The marbled paper was so hard to cut.  But, after coming up with a design that would alow the paper to shine, I was able to cut the paper.  Yea Me!!!!  Letting go of pretty paper can be one of the hardest things to do.

20161112_102301We all love color inspiration and finding new combinations of colors.  Hear is a pinable that you can share on Pintrest!  This color combination would make wonderful fall cards using a die as a stencil.  (something like the leaflets….hint hint)slide1

This is Lydia’s video so you can see just how amazing and quick this technique is!


Thanks for stopping buy today.  I sure hope you will give the Shaving Cream technique a second chance.  It is quite fun and wonderful.  I love how it looks with stencils.  I hope each of you have a blesses Sunday!

Much Love,


Jennifer

Read More