
Faux Batik with the Flirty Flowers Stamp Set!
I have had so much fun playing with the Faux Batik technique over the past couple of weeks. And, I’m so very excited to show you how to achieve beautiful Batik with stamped images. My friend, and Inking Royalty Team Leader, Brian King invited me to be a Guest Stamper on his blog. Thank You Brian, for this awesome opportunity!!! I am truly honored to be a Guest on your blog and apart of the Inking Royalty. And Thank you to all of those who have hopped over from his blog to see more detail about the Faux Batik process.
Batik is a wax resist that is used for fabric dyeing. The process of Batik can also be used in other mediums, such as rice paper watercolor. I fallow a lot of artist on Instagram. It is one of the places that I go to for inspiration. One of the artist, Emily Jeffords, that I fallow has been doing a lot with Batik and painting. Her batiks are amazing. And made me want to try to make something similar for cards.
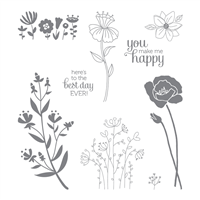
For the Faux Batik technique, I have found that it works best with stamped images that are more solid. Verses ones that have lots of details or are sketchy looking. Batiking is a very organic looking process. There for flowers and leaves are really beautiful with the Faux batik. The Flirty Flowers stamp set is just perfect.

This stamp set is so happy and the flowers have such a fresh feel.
Today, I am sharing details for the Faux Batik techniques with you. Also, at the bottom of the post is a video if you would like to see the technique in action. If you have any questions about the technique feel free to email me at westsidepapercreations@gmail.com If you would like to see other cards featuring this technique click here and here
The first step is to gather up the supplies that you will need. This includes tissue paper, shimmery white cardstock, versamark ink, embossing powder, embossing buddy, heat tool, inks of your choice, stamps, and baby wipes
After you have gathered up your supplies, the next step is to heat emboss a stamped image onto the tissue paper. To do this you will need your versamark ink, embossing powder, embossing buddy, and heat tool. Be sure to use the embossing buddy first. This will help keep stray embossing powder form sticking in unwanted areas. After using the embossing buddy, you want to stamp the image with versamark, add the embossing powder, pour off any access powder, and heat set the image.

After you have the tissue paper embossed. It is time to make a Batik image!! To do this you need to place the tissue paper over the shimmery white card stock.

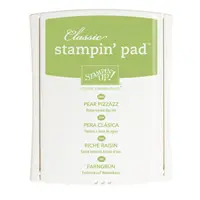
The next step is to start adding ink to the tissue paper with a baby wipe. I work from lightest color to darkest color. In this case Pool Party was the first color added .

This is what is should look simular to after adding the first color

Then, Pear Pizzazz

and Finally, Old Olive.

After adding the Old Olive ink. You can go back to your lightest color and add more if you like. The final step is to remove the tissue paper to reveal your Faux Batik

You can use your tissue paper more than once if you are using the same colors. Also, do not throw your tissue paper away. You can use this for another card showing off the pretty embossing. I used silver embossing powder for my card. And I am planning a second card that uses the tissue paper layer. I love the look of the metallic embossing powders with the ink around them. Also, this technique works very well on Whisper White Card Stock.
When using a bold technique, like this Faux Batik, it is best to keep the rest of the card quite simple. This allows for your handy work to shine.

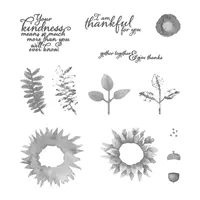
- After the Faux Batik has dried it is time to add a sentiment. I chose one from the upcoming Holiday Catalog. This sentiment is in the Painted Harvest stamp set (available Sep 1) . It is stamped in Early Espresso ink
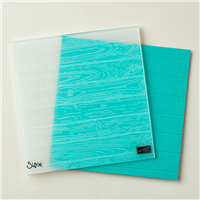
- The background is the pinewood Plank texture impression embossing folder. Use the folder to emboss Early Espresso cardstock. After embossing, I added some gold leafing to the texture. This give it a shimmery weathered look.
- The only thing left is to put the card together and pop up the Faux Batik
This card is a standard A2 card (4 1/4 by 5 1/2) . The card base is made from a 8 1/2 by 11 Early Espresso cardstock cut in half at 5 1/2 inches on the 11 side and scored at 4 1/4 inches. Each layer is as follows. Pear Pizzazz 4 1/8 by 5 3/8 inches. Early Espresso 4 by 5 1/4 inches and embossed with the pinewood planks embossing folder. Pear Pizzazz 3 1/4 by 4 5/8 inches . Shimmery White with Faux Batik 3 1/8 by 4 1/2 inches
Each of your comments makes me smile! Please, comment HERE.
The Carols of Christmas Early Release is now available for you to purchase. You are going to love this set so much. It is my must have from the Holiday Catalog. It is amazing!!! So very easy to use and just simply perfect!!! It will remind you of why you love stamping in the first place. The stamp set pairs with the Card front builder dies! These dies rock!!!! They will make every Holiday Card sing in glory!!!!


Thank you for stopping by!! I so enjoyed sharing this fun technique with you!! I hope each of you have a fablous Friday!! And that you have a moment to be creative and share your creative flow with others!!
Peace & Happiness-


This is absolutely stunning. I’ve never seen batik done this way. Thank you for the excellent directions.
Thank you so much-Jackie
This is an amazing technique, and I’m thrilled that you are my guest designer today! I love that you provided a wonderful step-by-step photo tutorial AND video tutorial. Brilliant! I adore you, and I adore this project, and I adore this technique.
Thanks, Brian, for sharing Jennifer’s beautiful technique! Now I’m going to try this today! Hugs!
Sharon- I have so enjoyed sharing with Brian’s fallowers. Such fun!!!
I’m here from Brian’s blog. Thanks so much, Jennifer, for allowing him to post your beautiful batik technique. I love learning new techniques and this one is not so intimidating after watching your detailed instructions on the video.Enjoy your day.
I am so glad that you hopped over from Brian’s blog!! I love his work… I too love a good technique! Thanks for stoping by today
Thank you Jennifer for the excellent instructions. I got here from Brian’s blog. Your card is absolutely beautiful and I am heading to my craft room right now to try it out. Do you have any instructions or supply list for the foiling?? Loved the “picture frame” background too.
Carole- I so glad that you hopped over from Brian’s blog! He is amazing as you know! I have been working on a video about foiling. It is coming soon. I’ll email you the instructions Thanks for stopping by today! What fun
You are so inspiring! You have such a great way of taking different art techniques and transferring it to work on cards. I love this card and I cannot wait to try this technique. Your instructions and video are so easy to follow!
Andrea- thank you so much! I have loved sharing with you guys today ?
Lovely! I can’t wait to try this new technique! Thanks.
Leslie- hope you enjoy playing with this fun technique
OMGosh, Jennifer!! I’ve been stamping for quite some years and have never come across this technique…it is quite beautiful! Thank you so very much for sharing with us.
Hugs!
Sharon
Sharon- I actually found it on Pinterest, so I thought. But, when I went back to find the origin, it was gone…. Anyway, thanks for stopping by today!! Hugs back
What do you use for the gold leafing? I am not familiar with what product to use for this.
I have never used tissue paper – love how pretty this is!
I buy mine from the local craft store. What I bought was mix metal leafing flakes. Then I just picked out the gold flakes for this project. It is normally close to the craft paint. And would be the same thing you use to add guilding to a picture frame. Hope this helps. I just recently started using tissues paper for cards…there’s so much you can do with it! Have fun playing
What a fun technique! Thank you for the tutorial!! Happy Friday 🙂
Lisa- thank you!!!
Love the technique and it is so simple! May be making a few of these. Thanks to you and Brian for sharing!
Bonnie- I hope you do! It is so much fun..I have enjoyed sharing with Brian’s fallowers today!
Jennifer, I also hopped over from Brian’s blog and I am glad I did. I LOVE your cards! The tutorial & video were absolutely wonderful. I can’t wait to use your technique and attempt to case your cards. Thank you so much for sharing.
Maureen
Maureen- thank you so much! I am thrilled to be sharing with Brian’s blog today! What fun!
Just gorgeous – such a lovely technique and you explained it perfectly. But I have to say, the gold leaf takes it over the top! It is a STUNNING addition. Great job!
Thank you so very much, Shannon!!! Leafing is one of my summer addictions in card making…
Hi….GORGEOUS card….and a technique I have never seen before! Thanks so much for sharing.
I do wonder how you did the gold leaf on the woodgrain background…?
Shel- thank you so very much!! I’ll email you the Leafing information
OMG you are amazing!
As are you Rock Star, Lydia ??
Jennifer you never cease to amaze me with your fabulous techniques you find and show case. Just lovely and I’ll be using it my classes soon.
Lynn- I hope you and your class enjoy the technique! It is so much fun! Thank you for the kind words
What an amazing technique! Thanks for sharing!
Areli- thank you !!!
Love this technique and can’t wait to try it. Thanks for sharing!
Carol- thank you!
I’ve been waiting patiently and you have rewarded me. What a great technique. I love the results. Thanks so much for sharing it with us.
Jan- you just made me smile! Thank you!
Brilliant!! I have never seen this technique before! I have to try this!!
Lynsay- thank you! It really is a fun technique
Beautiful technique! Thanks for sharing with us. Do you think you could use moist Stampin’ Sponge instead of the baby wipe? Does the baby wipe affect the surface of your ink pads?
Nancy- you could try a moist sponge and see. I have used baby wipes a lot and they don’t seem to affect the surface. Other than you have to re-ink the stamp pad more often. But, I would assume that would be true with a damp sponge as well .
Love this technique. I will be using it in the near future. Thank you for the tutorial.
Ann- thank you! I hope you enjoy the technique
Thank you for sharing with Brian King, now I will try this exciting technique and watch your site.
Thank you for hopping over from Brian’s nlog!
Wow that’s amazing. I never heard of this technique. Going to have to try it. Thanks for sharing. From Saskatchewan Canada
Karen- thank you for stopping by! Hope you enjoy the the technique when you try it out!
Thank you so much for the detailed directions. I have always wanted to try this but never knew how. this will be fun to do. Thanks again.
I have checked your blog and i’ve found some duplicate content, that’s why you
don’t rank high in google, but there is a tool that
can help you to create 100% unique content, search for; boorfe’s tips unlimited content
This is beautiful! Enjoyed your tutorial, thank you!
Thank you! Hope you will give faux batik a try
Your card is absolutely stunning! I am going to have to try this myself. Thanks for sharing the directions. Appreciate it.
Bette, please share if you do decide to try it! I would love to see what you create using faux batik. It is truly one of my all-time favorite techniques